I’ve had a few requests to document the installation of the latest release of ConfigMgr, so here it is.
I’ve recently posted an upgrade guide that will get you from ConfigMgr 2012 (SP1+) to the new version of ConfigMgr. You can view that post here and previously I have posted a Step by Step guide for ConfigMgr 2012 R2 here.
This post will guide you through the installation of a single primary site server with MP and DP roles installed as part of the install wizard and SQL installed locally.
Take a look at Microsoft’s Supported Configurations documentation on TechNet before embarking in any installation.
This guide assumes that no previous version of ConfigMgr is installed in the Active Directory domain it is being installed into.
Before installing ConfigMgr 1511 you will need to run through some prep work to get the Active Directory configured and extended, along with some application and role/feature installs.
Prepare Active Directory for Configuration Manager
Create the System Management Container in AD
Connect to a domain controller and load ADSI Edit. Under the System OU create a new Object
Choose Container and click Next.

Enter the name System Management and click Next.
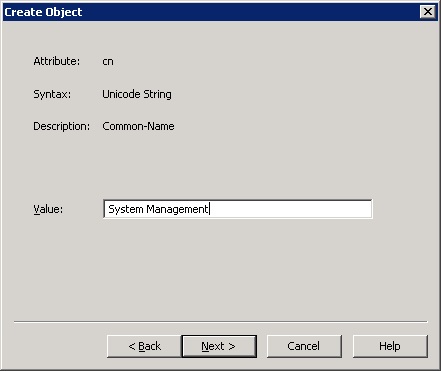
Complete the wizard and close ADSIEdit.
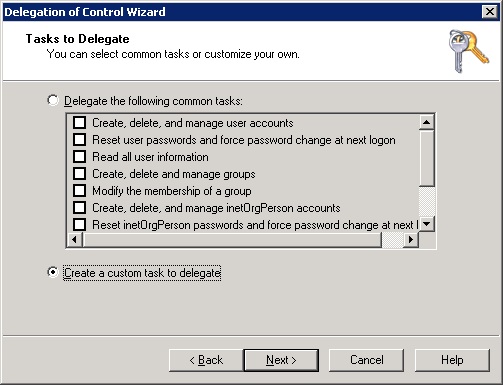
Delegate control to the SCCM site server to the newly created container in AD Users and Computers. Create a custom task to delegate and choose ‘This folder, existing objects in this folder and creation of new objects in this folder’

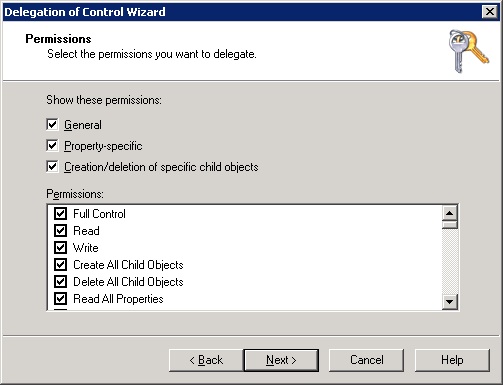
Check all Permission boxes and complete the wizard
Extend the Schema
From the ConfigMgr media copy the \SMSSetup\Bin\x64\ folder to a Domain Controller holding the Schema Master Role. Ensure the account used is a member of the Schema Admins group in AD. Right click the Extadsch.exe and choose ‘Run as Administrator ‘.

A log file ‘ExtADSch.log’ will be generated on the root of the C: Drive. Check for the entry ‘Successfully extended the Active Directory schema.’
To check what Extadsch.exe is doing to the Active Directory then open up the file ConfigMgr_ad_schema.ldf that is located in the same folder.
Install Site Server Prerequisites
The following roles and features need to be installed onto the SCCM Site Server prior to installation:
- BITS
- Remote Differential Compression
- IIS Components*
- .Net Framework 3.5
- .Net Framework 4.5
*Add the following IIS components
| Common HTTP Features
Default Document Directory Browsing HTTP Errors Static Content HTTP Redirection Health and Diagnostics HTTP logging Logging tools Request Monitor Tracing Performance Static Content Compression Security Request Filtering Basic Authentication IP and Domain Restrictions URL Authorization Windows Authentication Application Development .NET Extensibility 3.5 .NET Extensibility 4.5 ASP ASP.NET 4.5 ISAPI Extensions ISAPI Filters Management Tools IIS Management Console IIS 6 Management Compatibility IIS 6 Metabase Compatibility IIS 6 Management Console IIS 6 Scripting Tools IIS 6 WMI Compatibility IIS Management Scripts and Tools Management Service |
Install Windows Assessment and
Deployment Kit (Windows ADK) for Windows 10
Download the Windows 10 RTM ADK release 10.0.26624.0 from here
Run the adksetup.exe file.

Click to install the ADK files into the default path. Click Next.

Decide whether to add Windows Kits to the system. Click Next.

Accept the ADK licence agreement.

Select only Deployment Tools, Windows PE and USMT components for installation. Click Install.


Click Close when complete

Install SQL Server 2014 and SP1
SQL Server 2014 SP1 with no cumulative update is being installed as the SCCM database. For Supported versions of SQL Server check TechNet here
The initial install is SQL RTM.
Run the setup.exe
Install a new stand-alone installation of SQL 2014.

Enter a product key for SQL and click Next.

Accept the licence agreement and click Next.

At this stage you can opt to turn on Windows Updates for SQL. Click Next.

Address any Install Rules that need resolving. Click Next.

Choose ‘SQL Server Feature Installation’ so the install can be customised and click Next

Select Database Engine Services>Full-Text and Semantic Extraction for Search and Management Tools – Basic and Complete. Change any install paths for SQL at this stage. Click Next.

Choose the Default Instance and click Next.

Select any accounts to run the SQL services. Note that using a named account for SQL services will require a SPN creating in AD (see Optional configurations here).

Click the Collation tab and then the Customize button.

Choose the ‘SQL Collation, used for backwards compatibility’ option and choose SQL_Latin1_General_CP1_CI_AS. Click Ok. Click Next.

Use Windows authentication and Add the current user. Click Next.

Click Install to begin the installation process.


Click Close when complete

Download the SQL Server 2014 SP1 from here
Run the SQLServer2014SP1-KB3058865-x64-ENU.exe file
Accept the licence agreement and click Next.

Click Next

Address any in use features

Click Next when ready to progress the upgrade

Click Update


Click Close when the upgrade is complete
Once installed open up SQL Server Management Studio and limit the amount of RAM SQL can use to 50% of total RAM. Set the value for both max and min.

Install WSUS and KB3095113
If you are installing a SUP on your primary site server then you will need to install WSUS and KB3095113 (Server 2012 and 2012 R2 only).
In the Add Roles and Features Wizard select Windows Server Update Services.

Click Add Features

If using the SQL Server database you can remove to install the WID (Windows Internal Database)

Click Remote Features then click Next

Click Next

Select Database to use the SQL Server. Click Next

Enter a location to store the WSUS Content and click Next

Enter the NETBIOS name of the ConfigMgr site server (it’s hosting the SQL DB) and select ‘Check Connection’.

Click Install


Once the installation is complete click Close

Now launch the post installation tasks


Download the KB3095113 hotfix from here and install.
Install SCCM 1511
Download the SCCM media and run the splash.hta file. Click Install

Click Next

‘Install a Configuration Manager primary site’ will already be selected. Click Next.

Enter a licence key and click Next.

Accept the licence agreement and click Next

Accept the pre-requisite licence terms and click Next

Create a folder to store the pre-requisite downloads. Populate the download path with this folder location. Click Next


Select the language for the console and reports. Click Next

Select the language for the client computer. Click Next

Enter a 3 digit site code and site name and click Next. Be aware of Microsoft list of pre-reserved site code names. http://support.microsoft.com/kb/279868/en-us

Choose to install a stand-alone primary. Click Next

Click Yes when prompted

Click Next to set the Database information.

Set the locations to the SQL transaction and log files. Click Next

Click Next at the SMS Provider screen

Set ‘Configure the communication method on each site system role’ as a PKI infrastructure is not being used. Click Next.

Click Next to install a Management Point and Distribution Point.

Click Next at the Usage Data screen

Ensure ‘Yes, let’s get connected’ is selected to take advantage of the new Service Connection Point feature. Click Next

Click Next at the Summary Screen

Pre-requisite checks will run. Address any failed statuses. I have to change my SQL service to run with a domain service account, NETWORK SERVICE or LOCAL SYSTEM.

You can continue on Warnings but take a look at those post install. Click Begin Install.


Click Close once the installation is complete.

Launch the SCCM Console. Ensure the site and database report as healthy in the Monitoring workspace under System Status>Site Status


Excellent install notes. Now it is time to scrap home lab and rebuild with the new version. A lot of work to get done tomorrow (DC, SCCM & EX 2016).
Will a primary site on older version still function with a new version CAS? Like if we upgrade the CAS on week 1, and then wait a week to do a primary, will that primary still function?
Thanks for your response.
For some reason I am getting hung up on the last part after the SQL database is created. When it copy files it stops and says that it has encountered fatal errors while performing the file operations.
The error logs show that the files failed to copy to the C:\ drive (see below)
My account is a domain and local admin.
Any thoughts? I would greatly appreciate it. I’m sure I am missing something obvious. I followed your guide (and loved it until the error part).
ERROR: Failed to copy C:\SYSCTRCONFIGMGRANDENDPNTPRTCTN_2012W_SP2\SMSSETUP\bin\x64\IntuneContentManager\Microsoft.Management.Services.Publishing.CommonStringResources.resources.dll to c:\program files\microsoft configuration manager\bin\x64\intunecontentmanager\microsoft.management.services.publishing.commonstringresources.resources.dll, Win32 error = 2 $$
ERROR: Failed to copy C:\SYSCTRCONFIGMGRANDENDPNTPRTCTN_2012W_SP2\SMSSETUP\bin\x64\IntuneContentManager\Microsoft.Management.Services.Publishing.CommonStringResources.resources.dll to c:\program files\microsoft configuration manager\bin\x64\intunecontentmanager\microsoft.management.services.publishing.commonstringresources.resources.dll. $$
Mark – sounds like corrupt media. Try downloading the source files again or write to another disk if using physical.
That worked, thank you very much!
Awesome
Hello,
I am looking to deploy SCCM CB, we are a school district with 10 building. I wanted to do this in VMware.
My plan was to have a Stand-alone Site Server with a Management Point on that server, separate server for a database, 2 distribution points, server for SUP, server for OSD, and one server for Application Catalog.
What do you folks think? Should this be enough? I would appreciate any input.
Thanks
Had to say when you haven’t provided any information number of clients, network topology etc
Sorry, we have between 3,000 – 5,000 devices.
Thanks
Mike. Sorry it’s not the sort of thing that can be advised from the details given. Other factors have to be taken into when defining a site over 10 sites. Recommend you get a consultant in to advise on the best set up for your topology.
• Hands on knowledge on System Center Configuration Manager 2012, Packaging, Automation, Imaging, software distribution, patching.
i need to learn this.i cant understand.pls help me.
Thank you very much for your comprehensive guides.
I’m looking for guidance on what size network is it appropriate to install SCCM. SCCM, much less SCOM, seems like a quite large complex system with a lot of moving parts, and I’m wondering if, since I’m only dealing with a 6 servers and a dozen or so VMs, does it make sense to implement SCCM? Our primary use for SCCM would be to enforce SC Endpoint Protection and other service updates. Currently I’m just updating manually.
I’ve looked around for guidelines or best practices on is SCCM is well-suited for a small network but I’ve not found anything relevant. Any advice or links would be greatly appreciated.
Thanks,
Simon