
Over the recent months, Niall Brady and I have been working on a series of blogs about using Microsoft Graph with your Windows 365 Cloud PC devices. We published part 3 at the end of 2024, with a couple more parts due soon to wrap up the series. Part 3 of the blog focused on provisioning your Windows 365 devices. The scripts we developed for the series are aimed at those getting started with MS Graph, with simple fire and forget commands, which got the job done.
We decided that we would create some more advanced scripts for admins, which would include some error handling, prompts for input, and more. You will be able to use these scripts to provision your Entra ID joined Cloud PCs for various scenarios, be it using a Microsoft Hosted network or an Azure Network Connection, Enterprise or Frontline builds, or choosing your Cloud PC image, language, or region etc.
The blog post will follow the format of part 3 of the previous blog, by stepping though the provisioning in the following manner:
- Install PowerShell 7
- Getting the Licence SKU
- Assigning the Licence to Users
- Adding licenced users to an Entra ID group
- Network choice for your Cloud PCs
- Create the Networking Components (optional)
- Find your Autopatch Group ID (optional)
- Create a Provisioning Policy
Install PowerShell 7
To avoid errors later on, and in order to get the full benefit of PowerShell, we’ll install PowerShell version 7. You can determine your PowerShell version using the following code, in Visual Studio Code.
$PSVersionTable
As you can see here, our PC is running an older version of PowerShell so it’s time to update it.

When installing the PowerShell extension in Visual Studio Code, you’ll be presented with an option to install the lastest release of version 7. Clicking the button will redirect to the Microsoft site to download the relevant install package. The actual URL link is here.

Once installed, restart Visual Studio Code and check the version again and it should reflect PowerShell version 7.4.6 as below.

WHAT RIGHTS ARE NEEDED???
Getting the Licence SKU
You need to assign a Windows 365 license to your users in order for them to use the service, much as you would with any Microsoft 365 product.
Using the following code, we can list all of those SKUs via Graph, this uses the following cmdlet Get-MgSubscribedSku.
The code is available from GitHub here.
Install-Module Microsoft.Graph.Identity.DirectoryManagement -Scope CurrentUser -Force -AllowClobber
Connect-MgGraph -Scopes "Organization.Read.All"
Get-MgSubscribedSku | Select-Object SkuId, SkuPartNumber
What exactly is this code doing?
It starts by installing the Microsoft.Graph.Identity.DirectoryManagement module, a subset of the Microsoft Graph PowerShell SDK. This module provides cmdlets to interact with Microsoft Graph APIs specifically related to directory and identity management.
Note, if you get the following in Visual Studio Code when running the Install-Module command ‘Install-Package: No match was found for the specified search criteria and module name ‘Microsoft.Graph.Identity.DirectoryManagement’. Try Get-PSRepository to see all available registered module repositories.’ then run the command Register-PSRepository -Default and then retry.
How do we know that we need to use this specific module? Well we can refer to the Microsoft documentation for the cmdlet Get-MgSubscribedSku to answer that question. We can see the module is referenced on that page, therefore we do not need to install all the Microsoft Graph modules on our device to be able to query using that cmdlet, but just that particular module.

Next, the command Connect-MgGraph authenticates the session to Microsoft Graph. The scope parameter Organization.Read.All permission grants the script access to read organisation-level data in Entra ID. The user will be prompted for authentication, if not already signed in, and may have to consent to be able to access, if this has not been performed previously in the tenant. Note, since we are only querying for data here, we only need Read permissions on this data and we are ensuring least privilege, where possible when using our scripts.
Finally, the script retrieves a list of subscribed SKUs (licences) from the organisation’s tenant in Entra ID and reports back:
- SkuId: The unique identifier for the SKU.
- SkuPartNumber: The friendly name or part number of the SKU (e.g., Microsoft_Intune_Suite).
Now that we know the SKU id of our available licenses, we can assign users to the Windows 365 Enterprise 4 vCPU, 16 GB, 128 GB license shown as d201f153-d3b2-4057-be2f-fe25c8983e6f CPC_E_4C_16GB_128GB in the PowerShell output.

Assigning the Licence to Users
OK, so let’s take the SKU and run some code to assign this to our users. The full code required to do this is located here.
This PowerShell script automates the process of assigning the specific licence to users in Entra ID using Microsoft Graph. It ensures that each user exists, checks if the license is already assigned, and assigns it if necessary.
The script starts by checking for the existence of the modules that we wish to use to be able to assign the licence to the users. The PowerShell cmdlets we are going to use in this script are Get-MgSubscribedSku and Get-MgUser. We know from previous that we need to install the Microsoft.Graph.Identity.DirectoryManagement module for the Get-MgSubscribedSku cmdlet, but for the Get-MgUser module we need to install Microsoft.Graph.Users. Refer to the documentation for the Get-MgUser module to confirm this, here.
As you can see from the code, we are checking if the modules are installed using the Get-Module command and if not then installing. Note, the parameters for the Install-Module command. We are using:
- –Scope CurrentUser: When set to CurrentUser, the module is installed only for the current user, in the user’s profile directory (e.g., ~\Documents\PowerShell\Modules). Using this parameter means we can install the module without the need for administrative rights on the device.
- -Force: Using this parameter overwrites an existing module with the same name, even if it’s already installed. This will bypass warnings or errors for conflicting versions.
- -AllowClobber: This parameter allows the installation of a module that may overwrite commands provided by another module. For example, both Microsoft Graph and AzureAD modules may have a cmdlet called Get-User. Using -AllowClobber ensures that the new module’s commands overwrite existing ones.
# Check if Microsoft.Graph.Users module is installed, install if not
if (-not (Get-Module -ListAvailable -Name Microsoft.Graph.Users)) {
    Install-Module Microsoft.Graph.Users -Scope CurrentUser -Force -AllowClobber
}

# Check if Microsoft.Graph.Identity.DirectoryManagement module is installed, install if not
if (-not (Get-Module -ListAvailable -Name Microsoft.Graph.Identity.DirectoryManagement)) {
    Install-Module Microsoft.Graph.Identity.DirectoryManagement -Scope CurrentUser -Force -AllowClobber
}
With the modules installed we then connect to Graph, this time we need to increase our permissions when connecting. Since we need to add users to licences we need to be able to write, therefore our scope is set to Group.ReadWrite.All.
Our SkuId is added to a variable and then we check if the SKU exists in our tenant (it should do since we retrieved this earlier). If not then we will write back that The specified SKU ID does not exist in the tenant and exit the script.
You’ll also see the Import-Module PowerShell commands being used in the code snippet below. Why does this differ from the Install-Modules we have used earlier? Well even after installing a module, you still need to load it into your current PowerShell session if you want to use its commands. Think of Install-Module as putting the tools in your shed, and Import-Module as taking them out when you need them.
Import-Module Microsoft.Graph.Users
Import-Module Microsoft.Graph.Identity.DirectoryManagement
Connect-MgGraph -Scopes "Group.ReadWrite.All"

# The SKU ID for the license you want to assign
$skuId = "d201f153-d3b2-4057-be2f-fe25c8983e6f"

# Check if the SKU exists
$skuList = Get-MgSubscribedSku | Where-Object { $_.SkuId -eq $skuId }

if (-not $skuList) {
    Write-Host "The specified SKU ID '$skuId' does not exist in the tenant. Exiting."
    exit
}
To add users to the licence, we are going to utilise a text file containing a list of all our users that we wish to add. We are using a variable $userIdsFilePath to state the location of the txt file, userID.txt. The file should contain the UPN for each user. We haven’t added any error checking for the existence of the file path, but as you start to build up your PowerShell knowledge, you could add some simple error checking here also.
# Path to the text file containing UPNs (one per line)
$userIdsFilePath = "C:\temp\userId.txt"

# Read UPNs from the text file
$userIds = Get-Content -Path $userIdsFilePath
When this section of the script is executed, the $userIds variable will hopefully be populated with your users that you wish to assign the licence to.

Now we will loop through each user in the $userIds variable (foreach ($userId in $userIDs) and perform the following:
- Check if the user exists in the tenant, if not write to the screen that the user does not exist and therefore is skipping.
- If the user does exist, then retrieve their licence details, if the licence is already assigned then skip, otherwise add the user to the licence.
# Loop through each UPN and check if the user exists and if the license is already assigned
foreach ($userId in $userIds) {
    # Check if the user exists
    $user = Get-MgUser -UserId $userId -ErrorAction SilentlyContinue

    if (-not $user) {
        Write-Host "User $userId does not exist. Skipping."
        continue
    }

    if ($user) {
    # Retrieve user license details
    $userLicenses = Invoke-MgGraphRequest -Method GET -Uri "https://graph.microsoft.com/v1.0/users/$userId/licenseDetails"

    # Check if the SKU ID is already assigned
    $licenseAssigned = $userLicenses.value | Where-Object { $_.skuId -eq $skuId }

    if ($licenseAssigned) {
        Write-Host "License is already assigned to $userId. Skipping."
    } else {
        # Assign the license if not already assigned
        Invoke-MgGraphRequest -Method POST -Uri "https://graph.microsoft.com/v1.0/users/$userId/assignLicense" -Body (@{
            addLicenses = @(@{ skuId = $skuId })
            removeLicenses = @()
        } | ConvertTo-Json) > Null

        Write-Host "License assigned to $userId"
    }
}
}
If the script executes with all users requiring to be added to the licence the output should look as below

If you look at admin.microsoft.com and check you licence, you will see the users are assigned.

We can easily test our error checking. The script is re-run by ensuring that Ronnie already has a licence assigned and therefore this reports back as License is already assigned. Skipping and by adding a made up user who is not in our tenant. We will be informed that the User does not exist. Skipping.

Adding licenced users to an Entra ID group
Next, we will add the licensed user(s) to an Entra ID group, you can name the group whatever you want but it would be a good idea to match the name of your Entra ID group to the provisioning policy that we will create later in this guide by using a naming convention. In this example, the script will be prompted to create an Entra ID group and we will call it W365 North Europe AAD W11 users via Graph and it will add the licensed user(s) to that group.
Grab this script from here.
You should be getting familiar now with installing the modules. This time we need the Microsoft.Graph.Groups module and we are checking to see if it is already installed and installing if not.
Once connected to Graph, we are using a Read-Host command. This will provide a prompt on screen and wait for input and store it in the $groupName variable. Our prompt, as you may have guessed, is for you to enter a group name.
# Check if Microsoft.Graph.Groups module is installed, install if not
if (-not (Get-Module -ListAvailable -Name Microsoft.Graph.Groups)) {
    Install-Module Microsoft.Graph.Groups -Scope CurrentUser -Force -AllowClobber
}

# Import and connect to Microsoft Graph
Import-Module Microsoft.Graph.Groups
Connect-MgGraph -Scopes "Group.ReadWrite.All"

# Prompt the user for the group name
$groupName = Read-Host "Please enter the name of the group"
We now check, using the Get-MgGroup cmdlet, for the group in our tenant. If the group does not exist, we can create the group. We need to pass specific parameters to the cmdlet for this to work. These are stored in a variable called $GroupParam. The details required are:
- DisplayName: This will be the group name details that we enter when prompted by the script.
- GroupTypes: For an Entra ID security group, this is left blank
- SecurityEnabled: Since this will be an Entra ID security group, we mark this as True. If we were creating a Microsoft 365 group, this value would be False.
- MailEnabled: We do not require a mail enabled group, therefore this value is set to False.
- MailNickname: We do not require a mail nickname, therefore this value is also set to False.
The group is created using the New-MgGroup cmdlet. We pass the details contained in $GroupParam via the -BodyParameter parameter. If the group already exists, we will be notified of this.
# Check if the group exists by name
$group = Get-MgGroup -Filter "displayName eq '$groupName'" -ErrorAction SilentlyContinue

if (-not $group) {
    # If group doesn't exist, create it
    Write-Host "Group '$groupName' does not exist. Creating new group."
     $GroupParam = @{
        DisplayName = $groupName
        GroupTypes = @()
        SecurityEnabled = $true
        MailEnabled = $false
        MailNickname = $false
    }

    $group = New-MgGroup -BodyParameter $GroupParam
    Write-Host "Group '$groupName' created."
} else {
    Write-Host "Group '$groupName' already exists."
}
Our group does not exist and is created.

If our group already exists, no further action is needed.

Similar to our previous script, we will use the userID text file to call each user and add them to the new group. If they do not exist in the tenant then skip, if they are already a member of the group then inform on the screen otherwise add the user to the group.
# Path to the text file containing UPNs (one per line)
$userIdsFilePath = "C:\temp\userId.txt"

# Read UPNs from the text file
$userUPNs = Get-Content -Path $userIdsFilePath

# Loop through each UPN and check if the user exists
foreach ($upn in $userUPNs) {
    # Check if the user exists
    $user = Get-MgUser -UserId $upn -ErrorAction SilentlyContinue

    if (-not $user) {
        Write-Host "User $upn does not exist. Skipping."
        continue
    }

    # Check if the user is already a member of the group
    $isMember = Get-MgGroupMember -GroupId $group.Id | Where-Object { $_.Id -eq $user.Id }

    if ($isMember) {
        Write-Host "User $upn is already a member of the group."
    } else {
        # Add the user to the group using their object ID
        New-MgGroupMember -GroupId $group.Id -DirectoryObjectId $user.Id
        Write-Host "User $upn added to group"
    }
}
On first run, our users are added to the group, our made up user is skipped.

In the Intune console, we can see the users are added to the new group.

If a user was already a member of the group, our error handling would pick this up accordingly.

Network choice for your Cloud PCs
Now, we need to make decision. We need to decide which network our Entra ID joined Cloud PCs will use.
There are two choices listed below:
• A Microsoft-hosted network
• Your own network (using an Azure network connection)
Tip: If you want your Entra ID joined Windows 365 Cloud PCs to be 100% cloud only then select the built-in Microsoft-hosted network. If you go with that choice then the next script becomes redundant. If however you want to control the region where your network is located (in relation to your users) and which DNS settings your Cloud PC’s will use plus many other additional network settings, then you should use the next script.
Create the Networking Components (optional)
Windows 365 uses Resource Groups in Entra to store certain resources, such as Virtual networking. When creating a provisioning policy for a Cloud PC you can select to use the Microsoft hosted network (cloud only) or use an Azure network connection (ANC). If you choose the option to use your own network via an Azure network connection, then you will need to have a Resource Group and Virtual Network set up and ready to use.
The following script will assist you with this, by creating or using existing Resource Groups and Virtual Networks as well as setting up the ANC. Remember that this script is only required if you go the ANC route, if you use a Microsoft Host Network you do not need to run this script.
The script is located here.
We start off by installing any relevant modules. For Resource Groups and Virtual Networks we need to use the Az PowerShell module. This module lets you manage your Entra resources directly from PowerShell. It replaces the older AzureRM module and is the recommended way to interact with Entra through PowerShell.
We require PowerShell version 7 to be able to execute these modules. If you haven’t installed PS7 at this stage then we suggest that you do so. Go back to the start of the guide if you need some assistance with that.
# Install required modules if not already installed
if (-not (Get-Module -ListAvailable -Name Az.Accounts)) {
    Install-Module -Name Az.Accounts -Scope CurrentUser -Force -AllowClobber
}
if (-not (Get-Module -ListAvailable -Name Az.Resources)) {
    Install-Module -Name Az.Resources -Scope CurrentUser -Force -AllowClobber
}
if (-not (Get-Module -ListAvailable -Name Az.Network)) {
    Install-Module -Name Az.Network -Scope CurrentUser -Force -AllowClobber
}
if (-not (Get-Module -ListAvailable -Name Microsoft.Graph.Beta.DeviceManagement.Administration)) {
    Install-Module -Name Microsoft.Graph.Beta.DeviceManagement.Administration -Scope CurrentUser -Force -AllowClobber
}

# Import the modules
Import-Module -Name Az.Accounts
Import-Module -Name Az.Resources
Import-Module -Name Az.Network
Import-Module -Name Microsoft.Graph.Beta.DeviceManagement.Administration
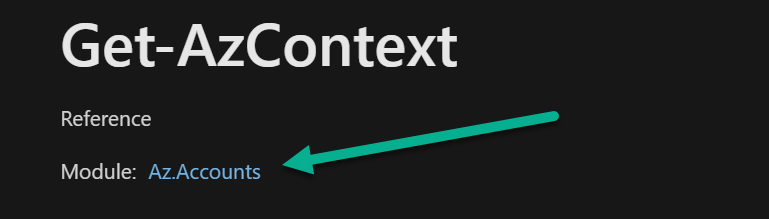
Once again, we can use the Microsoft documentation to discover the modules we need to use in our script. One of the cmdlets is Get-AzContext and we can see that the Az.Accounts modules is required here.
Now, we will connect to the Entra resources via the Connect-AzAccount. We will be asked to authenticate when this command is executed.
We will be prompted to select of a subscription after connecting. This subscription will be the one that will host our Entra resources. Afterwards, we connect to Graph, since we will need this later in the script when setting up the Azure Network Connection.
# Connect to Azure account and capture subscription information
Connect-AzAccount
$subscription = (Get-AzContext).Subscription.Id
Write-Host "Using Subscription ID: $subscription"
Connect-MgGraph

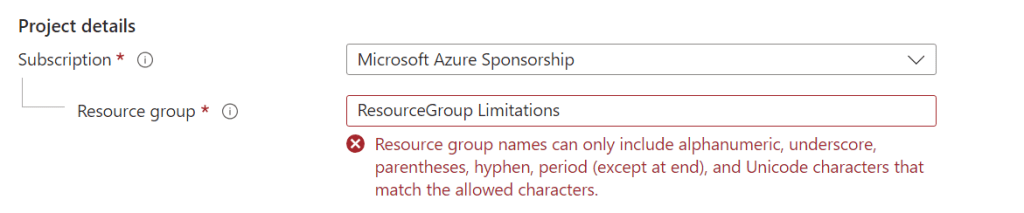
When creating our Resource Group and Virtual Network, we need to adhere to the limitations set by Microsoft. For example, when we create a Resource Group we must set the name of the group accordingly, and MS warns us if we do not. The warning states Resource group names can only include alphanumeric, underscore, parentheses, hyphen, period (except at end), and Unicode characters that match the allowed characters. When creating a Virtual Network, we must ensure that the figures correct and valid IP/Subnet addresses. The regex and Validate-IP function code assist with this when using the script, otherwise we could enter anything and our script would fail.
# Regular expression for validating resource group name
$rgNameRegex = '^[\w\(\)\.\-_]+$'
# Regular expression for validating IP address and subnet (CIDR format)
$cidrRegex = '^(?:\d{1,3}\.){3}\d{1,3}\/(?:[0-9]|[12][0-9]|3[0-2])$'

# Function to validate IP address ensuring each octet is between 0-254
function Validate-IP {
    param([string]$ipPart)
    $octets = $ipPart.Split('.')
    foreach ($octet in $octets) {
        if ($octet -lt 0 -or $octet -gt 254) {
            return $false
        }
    }
    return $true
}
The following code is used for our Resource Group. There is a lot going on here, but the basic steps are:
- Prompt for a Resource Group name
- If it doesn’t exist then then check if the Resource Group name is valid, if not display this on screen and suggest the correct syntax to use
- Prompt to enter a location for the Resource Group. If an invalid location is entered, after three attempts, show a list of valid locations to use and prompt again until valid.
- The Resource Group is stored in a variable called $resourceGroup
- If a new Resource Group, create it in the selected location
# Prompt for resource group name and validate
do {
    $resourceGroupName = Read-Host "Please enter the name of the resource group"
    if ($resourceGroupName -match $rgNameRegex -and $resourceGroupName[-1] -ne '.') {
        $resourceGroup = Get-AzResourceGroup -Name $resourceGroupName -ErrorAction SilentlyContinue
        if (-not $resourceGroup) {
            Write-Host "Resource group '$resourceGroupName' does not exist. Creating it."
            # Validate the location before creating the resource group
            $attempt = 1
            $maxAttempts = 3
            $locationsLoaded = $false
            $location = ""
            $locations = Get-AzLocation | Select-Object -ExpandProperty Location
            do {
                $location = Read-Host "Please enter the location"
                if ($attempt -eq $maxAttempts -and -not $locationsLoaded) {
                    Write-Host "Loading valid location names..." -ForegroundColor Yellow
                    Write-Host "Valid locations are:" -ForegroundColor Cyan
                    $locations | Sort-Object
                    $locationsLoaded = $true
                }
                if ($locations -contains $location) {
                    break
                } else {
                    $attempt++
                    Write-Host "Invalid location entered. Please try again." -ForegroundColor Red
                }
            } while ($true)
            # Create the resource group if valid location is provided
            New-AzResourceGroup -Name $resourceGroupName -Location $location
            $resourceGroup = Get-AzResourceGroup -Name $resourceGroupName -ErrorAction SilentlyContinue
        }
        break
    } else {
        Write-Host "Invalid resource group name. Names can only include alphanumeric characters, underscores, parentheses, hyphens, periods (except at the end), and Unicode characters." -ForegroundColor Red
    }
} while ($true)
Let’s see the script in action. If we enter an invalid Resource Group name, we are informed of this and prompted again to enter a name.

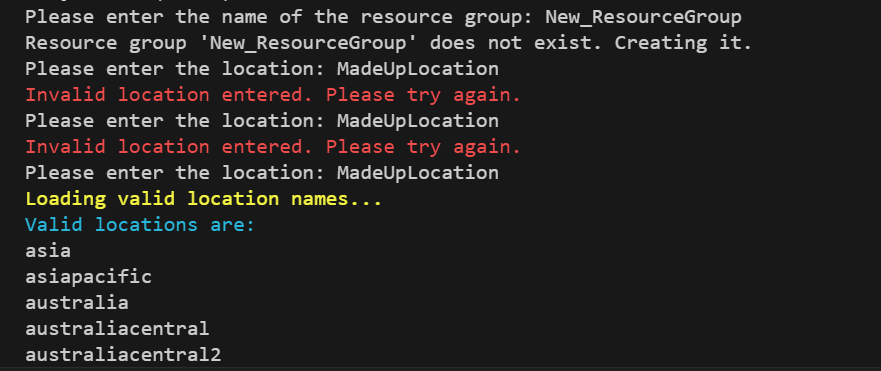
If we enter a Resource Group that does not currently exist in Entra, the script will create the Resource Group and then prompt for a location. If we enter incorrect information we are prompted again three times. After that the script will query the location via the Get-AzLocation cmdlet and present them on screen.
You could play around with the code and present the list of location prior to being prompted to enter a location if you wanted to dig into PowerShell a bit more.
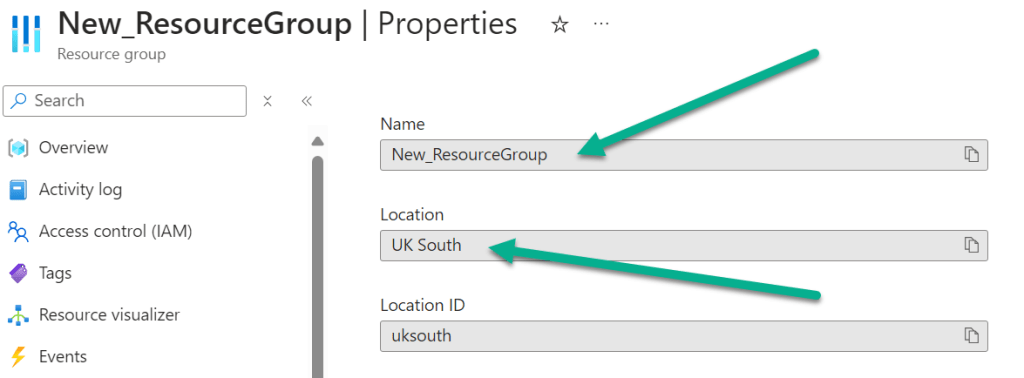
After entering a valid location, our Entra Resource Group will be created in the location we specified.

Now we need to set up our Virtual Network. To use your own network and provision Entra joined Cloud PCs, you must meet the following requirements:
- Azure virtual network: You must have a virtual network (vNET) in your Azure subscription in the same region as where the Windows 365 desktops are created.
- Network bandwidth: See Azure’s Network guidelines.
- A subnet within the vNet and available IP address space.
Our next section of code helps to define our Virtual Network.
We are initially prompted to enter a Virtual Network name. If the Virtual Network name matches the name of an existing network in your Resource Group, we are informed that this already exists and that we should enter a new name. Note that our code does not move an existing Virtual Network from another Resource Group and we must create a new one for the Resource Group we are using.
# Prompt for virtual network name and check if it exists
do {
    $vnetName = Read-Host "Please enter the name of the virtual network"
    $vnet = Get-AzVirtualNetwork -Name $vnetName -ResourceGroupName $resourceGroupName -ErrorAction SilentlyContinue
    if ($vnet) {
        Write-Host "Virtual Network '$vnetName' already exists. Please enter a new name." -ForegroundColor Red
    }
}  while ($vnet)

Now, we are prompted to enter the IP details and Subnet name and details, these details will be validated using our previous validation code. If the details entered do not match standards, we will be informed and asked to enter again. We are giving examples of the format to use when prompted.
# Prompt and validate the address prefix for virtual network
do {
    $addressPrefix = Read-Host "Please enter the address prefix for the virtual network (e.g., 10.0.0.0/16)"
    $ipPart = $addressPrefix.Split("/")[0]
    if (Validate-IP -ipPart $ipPart -and $addressPrefix -match $cidrRegex) {
        break
    } else {
        Write-Host "Invalid format or IP address. Please enter in valid CIDR format (e.g., 10.0.0.0/16)." -ForegroundColor Red
    }
} while ($true)

# Prompt and validate the subnet address prefix
do {
    $subnetPrefix = Read-Host "Please enter the address prefix for the subnet (e.g., 10.0.1.0/24)"
    $ipPart = $subnetPrefix.Split("/")[0]
    if (Validate-IP -ipPart $ipPart -and $subnetPrefix -match $cidrRegex) {
        break
    } else {
        Write-Host "Invalid format or IP address. Please enter in valid CIDR format (e.g., 10.0.1.0/24)." -ForegroundColor Red
    }
} while ($true)
Below is an example of incorrect details being added for the subnet entry.

If we enter valid details for our Virtual Network the flow will be as follows:
- Enter a Virtual Network name
- Enter an IP address range for the network
- Enter a subnet name
- Enter the subnet address prefix

Finally, we can create the Virtual Network and it’s associated subnet. We use the New-AzVirtualNetworkSubnetConfig and New-AzVirtualNetwork cmdlets to achieve this.
Note that we use the $resourceGroupName and $location variables from earlier because we store the Virtual Network in our specified Resource Group.
# Create virtual network and subnet
$subnetConfig = New-AzVirtualNetworkSubnetConfig -Name $subnetName -AddressPrefix $subnetPrefix
New-AzVirtualNetwork -ResourceGroupName $resourceGroupName -Location $location -Name $vnetName -AddressPrefix $addressPrefix -Subnet $subnetConfig
Write-Host "Virtual network '$vnetName' and subnet '$subnetName' created successfully."

If we take a look in the Azure portal, we can see that the newly created Virtual Network exists. It is located in the Resource Group we created previously.

So now we’re cooking, we have our components in place to be able to create the Azure Network Connection.
We start by prompting for the name of an ANC, we store this in the variable $connectionName. Next, we gather the Virtual Network and subnet details, using the Get-AzVirtualNetwork cmdlet, and check to ensure that they exist, if not then we exit from the script.
To be able to create the ANC, we need to specify certain parameters which are documented by Microsoft in the New-MgBetaDeviceManagementVirtualEndpointOnPremiseConnection cmdlet documentation. In our script we are passing the following parameters, which get stored in the variable $params:
- DisplayName: This is the ANC name you specify when prompted, as mentioned, stored in the $connectionName variable.
- Type: This is the join type for our Cloud PCs. We are specifying azureADJoin as our scripts are only supporting Entra joined.
- SubscriptionId: We need to tell the script that we are using a specific subscription. We have this stored in a variable $subscription when we authenticated using the Az PowerShell module Connect-AzAccount earlier ($subscription = (Get-AzContext).Subscription.Id).
- ResourceGroupId: We need to pass the ID of the target Resource Group. The required format for this is: /subscriptions/{subscription-id}/resourceGroups/{resourceGroupName}.
- VirtualNetworkId: Likewise, we pass the ID of the target virtual network. The required format for this is: /resourceGroups/{resourceGroupName}/providers/Microsoft.Network/virtualNetworks/{virtualNetworkName}.
- SubnetId: and finally, the SubnetId. We pass the ID of the target subnet in the required format: /subscriptions/{subscription-id}/resourceGroups/{resourceGroupName}/providers/Microsoft.Network/virtualNetworks/{virtualNetworkId}/subnets/{subnetName}.
With the parameters set, we create the ANC using the command New-MgBetaDeviceManagementVirtualEndpointOnPremiseConnection -BodyParameter $params.
We then monitor the status of the ANC creation, since this can take a few minutes and could fail along the way. Our script checks every 60 seconds, via the Get-MgBetaDeviceManagementVirtualEndpointOnPremiseConnection cmdlet to see what its status is. We are informed of the success or failure of the ANC creation.
# Prompt the user for ANC name
$connectionName = Read-Host "Please enter the name of the Azure Network Connection (ANC)"

# Get the Virtual Network and Subnet IDs
$vnet = Get-AzVirtualNetwork -Name $vnetName -ResourceGroupName $resourceGroupName
$subnet = $vnet.Subnets | Where-Object { $_.Name -eq $subnetName }

# Verify the network resources were found
if (-not $vnet -or -not $subnet) {
    Write-Host "Error: Virtual network or subnet not found!" -ForegroundColor Red
    exit
}

# Define parameters for ANC creation
$params = @{
    DisplayName      = $connectionName
    Type             = "azureADJoin"
    SubscriptionId   = $subscription
    ResourceGroupId  = "/subscriptions/$subscription/resourceGroups/$resourceGroupName"
    VirtualNetworkId = "/subscriptions/$subscription/resourceGroups/$resourceGroupName/providers/Microsoft.Network/virtualNetworks/$vnetName"
    SubnetId         = "/subscriptions/$subscription/resourceGroups/$resourceGroupName/providers/Microsoft.Network/virtualNetworks/$vnetName/subnets/$subnetName"
}

# Create Azure Network Connection
$ancProfile = New-MgBetaDeviceManagementVirtualEndpointOnPremiseConnection -BodyParameter $params

# Monitor the creation process
do {
    Write-Output "Azure Network Connection is being created... Running Checks please wait this might take a while"
    Start-Sleep -Seconds 60
    $policyState = Get-MgBetaDeviceManagementVirtualEndpointOnPremiseConnection -CloudPcOnPremisesConnectionId $ancProfile.Id
} while ($policyState.HealthCheckStatus -eq "running")

# Check the health status of the ANC
switch ($policyState.HealthCheckStatus) {
    "passed" {
        Write-Output "The Azure Network Connection created successfully."
    }
    default {
        throw "ANC creation failed. Review errors at: https://endpoint.microsoft.com/#view/Microsoft_Azure_CloudPC/EditAzureConnectionWizardBlade/connectionId/$($policyState.id)/tabIndexToActive~/0"
    }
}

Write-Host "Azure Network Connection '$connectionName' created successfully." -ForegroundColor Green
When you execute the script, you will be informed that checks are being run and, as mentioned, this will check every 60 seconds on the status.

The ANC will appear in the Intune console under Devices | Device onboarding | Windows 365 | Azure network connection. Note that this also displays Running checks for its Status.

When the ANC is created successfully, we are informed accordingly.

and in the Intune console, the Status reports as Checks successful. Note, the ANC is using our New_VirtualNetwork, the Join type is Microsoft Entra join, as expected and Region and Subscription match our expectations.

These are our optional steps completed, if we required the use of an Azure Network Connection.
Find your Autopatch Group ID (optional)
But hold on, we have another optional step to tackle. This is only if we intend to use Autopatch for patching the Cloud PCs when creating the provisioning policy.
To be able to associate Autopatch with the policy, we need to find the Autopatch Group ID value from the tenant. We have looked into querying this, without having a provisioning profile that uses Autopatch in place, but were unable to find a way to do this. So, we have to create a profile in the Intune console and then we can use either the Graph X-Ray browser extension or some PowerShell to retrieve the ID. We covered how to use Graph X-Ray in our original Windows 365 series back in December 2023, so please refer to that blog if you need to know how to use it, link here.
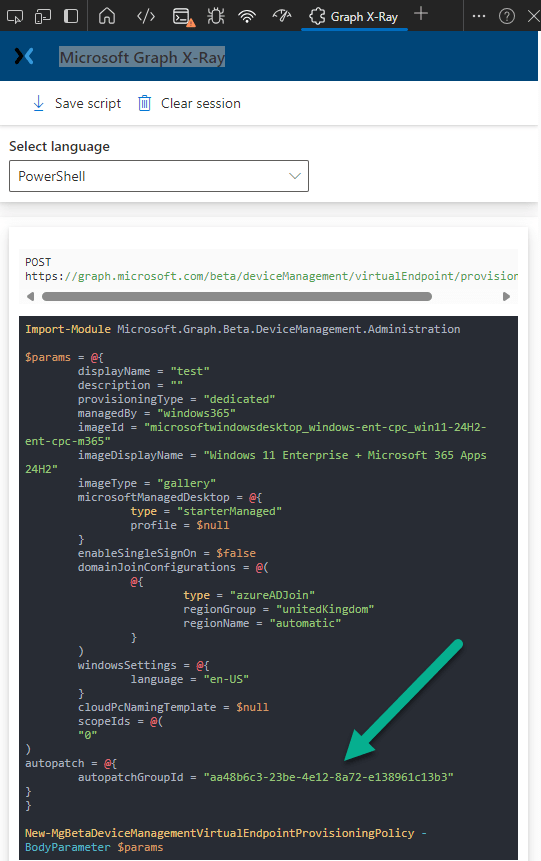
We can create any type of provisioning policy to get the information, simply navigate through and ensure Windows Autopatch is selected, and have Graph X-Ray open.
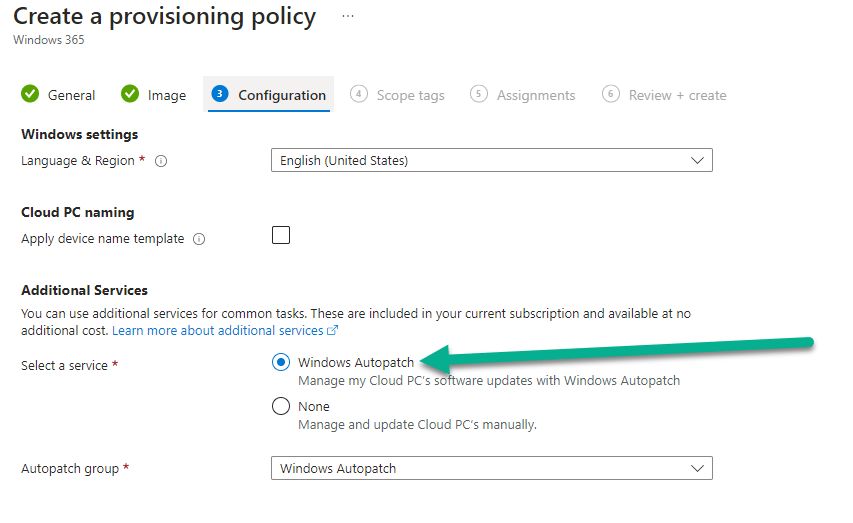
When we create the policy, it will display the autopatchGroupId details. Copy off these information as it is needed in the provisioning policy script. As we have discussed in the Graph X-Ray blog post, this extension is a great way to discover cmdlets and parameters required when you are constructing your scripts. Note here, for example, the cmdlet used to create the provisioning policy is New-MgBetaDeviceManagementVirtualEndpointProvisioningPolicy and we send over parameters using -BodyParameter $params. All the parameters are also listed, the ones below being the parameters specified when we created a test policy to check the Autopatch Group ID. We will use the New-MgBetaDeviceManagementVirtualEndpointProvisioningPolicy later in our provisioning policy script.
If you don’t have Graph X-Ray installed, then a PowerShell script can be used to query for the Autopatch Group ID. With a provisioning policy, using Autopatch, created run the following PS code. You can download the code here.
The code will check all your provisioning policies and return the first policy which has a valid Autopatch Group ID. If no policies have Autopatch assigned then we are informed accordingly.
# Install required modules if not already installed
if (-not (Get-Module -ListAvailable -Name Microsoft.Graph.Beta.DeviceManagement.Administration)) {
    Install-Module -Name Microsoft.Graph.Beta.DeviceManagement.Administration -Scope CurrentUser -Force -AllowClobber
}

Import-Module -Name Microsoft.Graph.Beta.DeviceManagement.Administration

# Connect to Microsoft Graph
Connect-MgGraph

# Query all provisioning policies
$provisioningPolicies = Get-MgBetaDeviceManagementVirtualEndpointProvisioningPolicy

# Get the first policy that has a valid Autopatch Group ID
$autopatchPolicy = $provisioningPolicies | Where-Object {
    $_.autopatch -and $_.autopatch.autopatchGroupId -ne $null -and $_.autopatch.autopatchGroupId -ne ""
} | Select-Object -First 1

# Output the Autopatch Group ID if found
if ($autopatchPolicy) {
    Write-Host "Autopatch Group ID: $($autopatchPolicy.autopatch.autopatchGroupId)"
} else {
    Write-Host "No provisioning policies with a valid Autopatch Group ID found."
}
The Autopatch Group ID is returned by the script.

If no policies are using Autopatch, we are informed of this and we would need to associate Autopatch with a policy to be able to get the ID.

Create a Provisioning Policy
We are now in our final stages of setting up our Cloud PCs via Graph. The last piece of the jigsaw is to create a provisioning policy that will provision the Cloud PCs for our targeted, licenced users.
The provisioning policy script, located here, is a series prompts to guide us through the process, which replicate the steps we would take when creating the policy in the Intune console.
After installing/importing the relevant modules and connecting to Graph, we are presented with the first prompt to enter the name of the provisioning policy. We check with the Get-MgBetaDeviceManagementVirtualEndpointProvisioningPolicy to ensure the provisioning policy name is not already taken, if so we prompt again for entry. We store the name of the policy in the variable $policyName.
# 1. Prompt the user for the provisioning policy name and re-prompt if the name already exists
do {
    $policyName = Read-Host "Please enter the name of the provisioning policy"
    $existingPolicy = Get-MgBetaDeviceManagementVirtualEndpointProvisioningPolicy -Filter "displayName eq '$policyName'"
    if ($existingPolicy) {
        Write-Host "Provisioning policy with the name '$policyName' already exists. Please enter a different name." -ForegroundColor Red
    }
} while ($existingPolicy)
The below image shows the policy name being added via the script.

The script supports the creating of Frontline devices, as well as Enterprise Cloud PCs. So, we prompt to choose between the two type. Selecting E for Enterprise and F for Frontline. There is error checking to ensure that $licenseType is either of these letters and either upper or lower case, as these are acceptable entries. Our selection is stored in the variable $provisioningType. Note, the $provisioningType is either Shared, for Frontline, or Dedicated, for Enterprise.
# 2. Prompt the user to choose between Enterprise or Frontline license
do {
    $licenseType = Read-Host "Would you like to use Enterprise or Frontline license? (Enter 'E' for Enterprise, 'F' for Frontline)"
    if ($licenseType -match "^[EeFf]$") {
        break
    } else {
        Write-Host "Please enter 'E' for Enterprise or 'F' for Frontline." -ForegroundColor Yellow
    }
} while ($true)

if ($licenseType -eq "F" -or $licenseType -eq "f") {
    $provisioningType = "shared"  # Frontline
} else {
    $provisioningType = "dedicated"  # Enterprise
}
We are now prompted to confirm whether we will use the Microsoft Hosted Network or an Azure Network Connection. We have some checking in place to ensure you choose either M for Microsoft Hosted Network or A for ANC.
If using an ANC, we must have run the networking optional script from earlier to be able to select one to use in the policy.
The code below illustrates the process if we select to use the ANC. We query for existing ANCs using the Get-MgBetaDeviceManagementVirtualEndpointOnPremiseConnection cmdlet. If we don’t find one then this is displayed on screen and we exit the script. If we have some ANC’s configured, they will be returned and we can select one of the ANCs to use. We then set the $domainJoinConfigurations array to include with on $PremisesConnectionId being equal to the $ancId (the ID of our chosen ANC) and also hardcode that we are going to create an Entra joined Cloud PC ( type = “azureADJoin”). This array will be used later on in the code when creating the provisioning policy.
# 3. Prompt the user to choose between Microsoft Hosted Network or Azure Network Connection (ANC)
$networkChoice = $null
do {
    $networkChoice = Read-Host "Would you like to use Microsoft Hosted Network or an Azure Network Connection? (Enter 'M' for Microsoft Hosted, 'A' for ANC)"

    if ($networkChoice -notmatch '^[AM]$') {
        Write-Host "Invalid selection. Please enter 'M' for Microsoft Hosted or 'A' for ANC." -ForegroundColor Red
        $networkChoice = $null
    }
} while ($networkChoice -eq $null)

if ($networkChoice -eq 'A') {
    # Fetch available Azure Network Connections (ANCs)
    Write-Host "Fetching available Azure Network Connections (ANCs), please wait..." -ForegroundColor Yellow
    $ancs = Get-MgBetaDeviceManagementVirtualEndpointOnPremiseConnection

    if (-not $ancs) {
        Write-Host "No Azure Network Connections found." -ForegroundColor Red
        exit
    }

    # Display the available ANCs for selection
    $index = 0
    $ancs | ForEach-Object {
        Write-Host "${index}: $($_.DisplayName) - ID: $($_.Id)"
        $index++
    }

    # Prompt the user to select an ANC
    $ancChoice = $null
    do {
        $ancChoice = Read-Host "Please select an ANC by entering the corresponding number (0 to $($ancs.Count - 1))"

        # Validate that the input is numeric and within range
        if ($ancChoice -match '^\d+$' -and ([int]$ancChoice -ge 0) -and ([int]$ancChoice -lt $ancs.Count)) {
            $ancChoice = [int]$ancChoice  # Convert valid input to integer
        } else {
            Write-Host "Invalid selection. Please enter a number between 0 and $($ancs.Count - 1)." -ForegroundColor Red
            $ancChoice = $null
        }
    } while ($ancChoice -eq $null)

    # Retrieve the selected ANC ID
    $ancId = $ancs[$ancChoice].Id

    Write-Host "You selected ANC: $($ancs[$ancChoice].DisplayName)"

    # Set the domainJoinConfigurations for ANC
    $domainJoinConfigurations = @(
        @{
            type = "azureADJoin"
            onPremisesConnectionId = $ancId
        }
    )
}
On screen, if we select to use the ANC, we are returned a list of available ANCs (if they exist) and we can choose to use one of them. Our script created ANC is available for us to use.

Our script has error checking in case we select a value which is not applicable.

If we select to use the Microsoft Hosted Network, the next section of code is executed. This code will query for the available regions that Cloud PCs can be placed in via this network. The Get-MgBetaDeviceManagementVirtualEndpointSupportedRegion cmdlet achieves this. The regions are displayed on screen and we can make our choice from the list. We then store our choice in the variable $regionGroup which is then stored in the $domainJoinConfigurations array use later on in the script. This code includes similar error checking to ensure the user enters a valid input when selecting the region from the list. Note, that we are setting the $regionName to Automatic, which is the recommended setting for this value. We have not programmed an option to choose the region name if there is more that one choice for that particular region. There’s a challenge for you!
else {
    Write-Host "You selected Microsoft Hosted Network"

    # Fetch available regions for Cloud PC provisioning
    Write-Host "Fetching available regions for Cloud PC provisioning..." -ForegroundColor Yellow
    $regions = Get-MgBetaDeviceManagementVirtualEndpointSupportedRegion

    # Display the available regions for selection
    $index = 0
    $regions | ForEach-Object {
        Write-Host "${index}: $($_.DisplayName) - Region Group: $($_.RegionGroup)"
        $index++
    }

    # Prompt the user to select a region
    $regionChoice = $null
    do {
        $regionChoice = Read-Host "Please select a region by entering the corresponding number (0 to $($regions.Count - 1))"

        # Validate that the input is numeric and within range
        if ($regionChoice -match '^\d+$' -and ([int]$regionChoice -ge 0) -and ([int]$regionChoice -lt $regions.Count)) {
            $regionChoice = [int]$regionChoice  # Convert valid input to integer
        } else {
            Write-Host "Invalid selection. Please enter a number between 0 and $($regions.Count - 1)." -ForegroundColor Red
            $regionChoice = $null
        }
    } while ($regionChoice -eq $null)

    # Retrieve the selected region
    $selectedRegion = $regions[$regionChoice]
    $regionName = $selectedRegion.DisplayName
    $regionGroup = $selectedRegion.RegionGroup

    Write-Host "You selected: $regionName in Region Group: $regionGroup"

    # Set the domainJoinConfigurations for Microsoft Hosted Network
    $domainJoinConfigurations = @(
        @{
            type = "azureADJoin"
            regionGroup = $regionGroup
            regionName = "automatic"
        }
    )
}

Now, we must enter whether we are going to use Single Sign-On on the Cloud PCs.
Single sign-on (SSO) streamlines access to Cloud PCs by bypassing the need for users to enter credentials during sign-in. Instead, it automatically authenticates users through Microsoft Entra. Without SSO, users must enter their Cloud PC credentials each time they connect unless credentials are saved in the client.
We store the choice in the variable $ssoEnabled.
# 4. Prompt the user for SSO choice
do {
    $enableSSO = Read-Host "Would you like to enable Single Sign-On? (Y/N)"
    if ($enableSSO -match "^[YyNn]$") {
        break
    } else {
        Write-Host "Please enter 'Y' for Yes or 'N' for No." -ForegroundColor Yellow
    }
} while ($true)

$ssoEnabled = ($enableSSO -eq "Y" -or $enableSSO -eq "y")
We error check to ensure a valid input is made.

The script only supports the use of the Windows 365 Gallery images. The script queries the available images via the Get-MgBetaDeviceManagementVirtualEndpointGalleryImage cmdlet and these are listed for choice. Again, we error check to ensure a valid input is entered. We store the choice in the variable $imageDisplayName.
# 5. Fetch available gallery images
Write-Host "Fetching available gallery images, please wait..." -ForegroundColor Yellow
$images = Get-MgBetaDeviceManagementVirtualEndpointGalleryImage

# Display the available images for selection
$index = 0
$images | ForEach-Object {
    Write-Host "${index}: $($_.DisplayName)"
    $index++
}

# Prompt the user to select an image by entering a valid number
$imageChoice = $null
do {
    $imageChoice = Read-Host "Please select an image by entering the corresponding number (0 to $($images.Count - 1))"

    # Validate that the input is numeric and within range
    if ($imageChoice -match '^\d+$' -and ([int]$imageChoice -ge 0) -and ([int]$imageChoice -lt $images.Count)) {
        $imageChoice = [int]$imageChoice
    } else {
        Write-Host "Invalid selection. Please enter a number between 0 and $($images.Count - 1)." -ForegroundColor Red
        $imageChoice = $null
    }
} while ($imageChoice -eq $null)

# Retrieve the selected image details
$imageId = $images[$imageChoice].Id
$imageDisplayName = $images[$imageChoice].DisplayName
Write-Host "You selected: $imageDisplayName"

Next, we need to select the language for the operating system installation. We tried to use Graph X-Ray to expose any Graph information regarding the drop-down menu from the provisioning policy in the Intune console, but it did not return any information. Maybe this has been populated via website code? Our fallback was to create an array called $languages with all the potential languages and their associated language code. Obviously, if this drop-down was to change, then we would need to update our array to match the choices available.
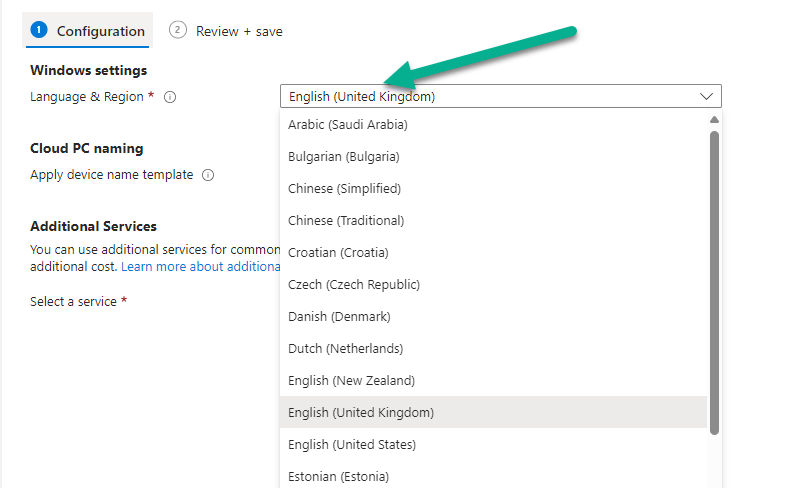
We are prompted to enter a choice for language and this is then stored in the variable $selectedLanguageCode.
# 6. Prompt the user to select a language from the list of supported languages
$languages = @(
    @{ Name = "Arabic (Saudi Arabia)"; Code = "ar-SA" }
    @{ Name = "Bulgarian (Bulgaria)"; Code = "bg-BG" }
    @{ Name = "Chinese (Simplified)"; Code = "zh-CN" }
    @{ Name = "Chinese (Traditional)"; Code = "zh-TW" }
    @{ Name = "Croatian (Croatia)"; Code = "hr-HR" }
    @{ Name = "Czech (Czech Republic)"; Code = "cs-CZ" }
    @{ Name = "Danish (Denmark)"; Code = "da-DK" }
    @{ Name = "Dutch (Netherlands)"; Code = "nl-NL" }
    @{ Name = "English (New Zealand)"; Code = "en-NZ" }
    @{ Name = "English (United Kingdom)"; Code = "en-GB" }
    @{ Name = "English (United States)"; Code = "en-US" }
    @{ Name = "Estonian (Estonia)"; Code = "et-EE" }
    @{ Name = "Finnish (Finland)"; Code = "fi-FI" }
    @{ Name = "French (Canada)"; Code = "fr-CA" }
    @{ Name = "French (France)"; Code = "fr-FR" }
    @{ Name = "German (Germany)"; Code = "de-DE" }
    @{ Name = "Greek (Greece)"; Code = "el-GR" }
    @{ Name = "Hebrew (Israel)"; Code = "he-IL" }
    @{ Name = "Hungarian (Hungary)"; Code = "hu-HU" }
    @{ Name = "Italian (Italy)"; Code = "it-IT" }
    @{ Name = "Japanese (Japan)"; Code = "ja-JP" }
    @{ Name = "Korean (Korea)"; Code = "ko-KR" }
    @{ Name = "Latvian (Latvia)"; Code = "lv-LV" }
    @{ Name = "Lithuanian (Lithuania)"; Code = "lt-LT" }
    @{ Name = "Norwegian (Bokmål)"; Code = "nb-NO" }
    @{ Name = "Polish (Poland)"; Code = "pl-PL" }
    @{ Name = "Portuguese (Brazil)"; Code = "pt-BR" }
    @{ Name = "Portuguese (Portugal)"; Code = "pt-PT" }
    @{ Name = "Romanian (Romania)"; Code = "ro-RO" }
    @{ Name = "Russian (Russia)"; Code = "ru-RU" }
    @{ Name = "Serbian (Latin, Serbia)"; Code = "sr-Latn-RS" }
    @{ Name = "Slovak (Slovakia)"; Code = "sk-SK" }
    @{ Name = "Slovenian (Slovenia)"; Code = "sl-SI" }
    @{ Name = "Spanish (Mexico)"; Code = "es-MX" }
    @{ Name = "Spanish (Spain)"; Code = "es-ES" }
    @{ Name = "Swedish (Sweden)"; Code = "sv-SE" }
    @{ Name = "Thai (Thailand)"; Code = "th-TH" }
    @{ Name = "Turkish (Türkiye)"; Code = "tr-TR" }
    @{ Name = "Ukrainian (Ukraine)"; Code = "uk-UA" }
)

# Display the available languages for selection
$index = 0
$languages | ForEach-Object {
    Write-Host "${index}: $($_.Name)"
    $index++
}

# Prompt the user to select a language by entering a valid number
$languageChoice = $null
do {
    $languageChoice = Read-Host "Please select a language by entering the corresponding number (0 to $($languages.Count - 1))"

    # Validate that the input is numeric and within range
    if ($languageChoice -match '^\d+$' -and ([int]$languageChoice -ge 0) -and ([int]$languageChoice -lt $languages.Count)) {
        $languageChoice = [int]$languageChoice
    } else {
        Write-Host "Invalid selection. Please enter a number between 0 and $($languages.Count - 1)." -ForegroundColor Red
        $languageChoice = $null
    }
} while ($languageChoice -eq $null)

# Retrieve the selected language details
$selectedLanguage = $languages[$languageChoice]
$selectedLanguageCode = $selectedLanguage.Code
Write-Host "You selected: $($selectedLanguage.Name) with code: $selectedLanguageCode"

The next step of our code sets the Cloud PC naming template, That choice is optional in the Intune console, however, we have made this mandatory in our script. You could update the PowerShell to create a choice and skip if you do not wish to set a template name for devices.
We have to add error checking in our code as the Intune console states: Create unique names for your devices. Names must be between 5 and 15 characters, and can contain letters, numbers, and hyphens. Names cannot include a blank space. Use the %USERNAME:x% macro to add the first x letters of username. Use the %RAND:y% macro to add a random alphanumeric string of length y, y must be 5 or more. Names must contain a randomized string. Note, also, that RAND and USERNAME must be entered in capital letters therefore we have to address this in the code.
- $deviceNameTemplate = (Read-Host “Please enter a device name template (e.g., cpc-%RAND:5%)”).ToUpper(): This ensures the input is case-insensitive by converting the template name to uppercase.
- $randLength = [regex]::Match($deviceNameTemplate, “%RAND:(\d+)%”).Groups[1].Value and $userLength = [regex]::Match($deviceNameTemplate, “%USERNAME:(\d+)%”).Groups[1].Value: This code extracts numeric values (
yandx) from the macros%RAND:y%and%USERNAME:x%, respectively.If the macros are not present, the values will remain empty. - $randLength = [int]($randLength -as [int]) -ne 0 ? [int]$randLength : 0 and $userLength = [int]($userLength -as [int]) -ne 0 ? [int]$userLength : 0: This converts extracted values to integers. If
yorxis not a valid integer, defaults to0. This, therefore, ensures non-numeric or absent values do not cause runtime errors. - $strippedTemplate = $deviceNameTemplate -replace “%RAND:\d+%”, “” -replace “%USERNAME:\d+%”, “”: This step strips out the macros
%RAND:y%and%USERNAME:x%from the input template name to isolate the non-macro text. By doing so, it calculates the length of the static or “fixed” portion of the template name, which includes only the characters that the we have explicitly entered (e.g., “cpc-” in “cpc-%RAND:5%”). This fixed portion is then combined with the lengths of the dynamic parts (the numbersyfrom%RAND:y%andxfrom%USERNAME:x%) to determine the total length of the final device name. - $totalLength = $strippedTemplate.Length + $randLength + $userLength: This calculates the total length of the device name by adding the length of the fixed portion of the template name ($
strippedTemplate.Length). and the numeric values ofyandxextracted from the macros.
As stated by Microsoft the $totalLength must be between 5 and 15 characters, if it is not then we are informed and re-prompted to enter valid details.
If the details are valid then the naming convention is stored in the variable $deviceNameTemplate.
# 7. Prompt for device name template (5-15 characters), convert to uppercase, and validate
do {
    $deviceNameTemplate = (Read-Host "Please enter a device name template (e.g., cpc-%RAND:5%)").ToUpper()

    # Extract the numbers from %RAND:y% and %USERNAME:x%
    $randLength = [regex]::Match($deviceNameTemplate, "%RAND:(\d+)%").Groups[1].Value
    $userLength = [regex]::Match($deviceNameTemplate, "%USERNAME:(\d+)%").Groups[1].Value

    # Ensure the values are integers and default to 0 if not present
    $randLength = [int]($randLength -as [int]) -ne 0 ? [int]$randLength : 0
    $userLength = [int]($userLength -as [int]) -ne 0 ? [int]$userLength : 0

    # Strip out %RAND:y% and %USERNAME:x% from the template before length validation
    $strippedTemplate = $deviceNameTemplate -replace "%RAND:\d+%", "" -replace "%USERNAME:\d+%", ""

    # Ensure the name is valid according to Microsoft rules (5-15 chars excluding macros, must contain %RAND:y%)
    $totalLength = $strippedTemplate.Length + $randLength + $userLength

    if ($totalLength -ge 5 -and $totalLength -le 15 -and
        $deviceNameTemplate -match "%RAND:\d+%") {
        break
    } else {
        Write-Host "Device name template must result in 5 to 15 characters and must include %RAND:y% where y is at least 5." -ForegroundColor Red
    }
} while ($true)

Write-Host "Device name template set to: $deviceNameTemplate"

Earlier in the blog post we used an optional script to gather the Windows Autopatch Group ID. In the next section of the code we are asked if we want to use the Autopatch services. The $autopatchGroupId is hard coded into the script, therefore, you will need to change the value to match the one associated with your tenant for this to work. Refer back to that section if you need to know how to achieve this.
# 8. Prompt the user for Autopatch services
$useAutopatch = Read-Host "Would you like to use Autopatch services? (Y/N)"
$autopatchGroupId = $null

if ($useAutopatch -match "^[Yy]$") {
    # Fetch autopatch group ID (assuming you have a predefined ID or method to fetch it)
    $autopatchGroupId = "aa48b6c3-23be-4e12-8a72-e138961c13b3"  # Example ID
    Write-Host "Autopatch Group ID: $autopatchGroupId"
}

Now, we need to enter the name of a group to assign the provisioning policy to. We query for the existence of the group using the Get-MgGroup and re-prompt for input if the group does not exist. We store the group name in a variable called $groupId.
# 9. Now prompt the user for an assignment group name
    $groupName = Read-Host "Please enter the EntraID group name for assignment"

    # Check if the group exists by name and re-prompt if not
    do {
        $group = Get-MgGroup -Filter "displayName eq '$groupName'" -ErrorAction SilentlyContinue
        if (-not $group) {
            Write-Host "Group '$groupName' does not exist. Please try again." -ForegroundColor Red
            $groupName = Read-Host "Please enter the EntraID group name for assignment"
        }
    } while (-not $group)

# Extract the Group ID
$groupId = $group.Id
Write-Host "Using group '$groupName' with ID: $groupId" -ForegroundColor Green

If we are provisioning Frontline devices then we need to associate the assignment with a Cloud PC service plan size. From the example in the Intune console, we can see that when we add a group for assignment we have to Select one of our Cloud PC size service plans.
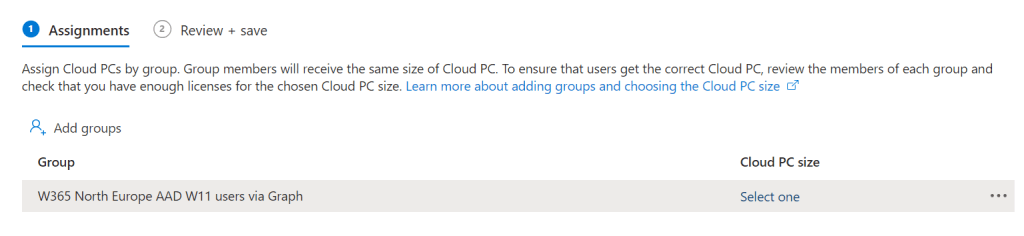
In the Select Cloud PC size view, we will be able choose Available sizes of service plans from the drop-down menu. The available options here is based on the Frontline subscriptions that you have subscribed to.

In the script, we query for the available Cloud PC sizes using the Get-MgBetaDeviceManagementVirtualEndpointFrontLineServicePlan cmdlet and enter the number of the corresponding service plan which we wish to use. This code is only executed if we chose Frontline earlier on ($provisioningType -eq “shared”). We then store the ID of the service plan in the variable $servicePlanId for later use when creating the provisioning policy.
    if ($provisioningType -eq "shared") {
        Write-Host "Fetching available Frontline service plans..." -ForegroundColor Yellow
        $servicePlans = Get-MgBetaDeviceManagementVirtualEndpointFrontLineServicePlan

        # Display the available service plans
        $index = 0
        $servicePlans | ForEach-Object {
            Write-Host "${index}: $($_.DisplayName)"
            $index++
        }

        # Prompt the user to select a service plan with validation
        $servicePlanChoice = $null
        do {
            $servicePlanChoice = Read-Host "Please select a service plan by entering the corresponding number (0 to $($servicePlans.Count - 1))"

            # Validate that the input is numeric and within range
            if ($servicePlanChoice -match '^\d+$' -and ([int]$servicePlanChoice -ge 0) -and ([int]$servicePlanChoice -lt $servicePlans.Count)) {
                $servicePlanChoice = [int]$servicePlanChoice
            } else {
                Write-Host "Invalid selection. Please enter a number between 0 and $($servicePlans.Count - 1)." -ForegroundColor Red
                $servicePlanChoice = $null
            }
        } while ($servicePlanChoice -eq $null)

        # Retrieve the selected service plan details
        $selectedServicePlan = $servicePlans[$servicePlanChoice]
        $servicePlanId = $selectedServicePlan.Id

        Write-Host "You selected: $($selectedServicePlan.DisplayName)"
    }

At this stage, we have collated all the data we need to be able to create the provisioning policy. The cmdlet to create the policy is called New-MgBetaDeviceManagementVirtualEndpointProvisioningPolicy.
If we take a look at the documentation, there is an example code snippet which documents the $params we can include and the format in which they must be specified.
The code below uses that formatting to create the $params array containing all the variables we have collected as we executed the script. This is passed in the -BodyParameter parameter
# Define the body for the provisioning policy creation
$params = @{
    "@odata.type" = "#microsoft.graph.cloudPcProvisioningPolicy"
    displayName = $policyName
    provisioningType = $provisioningType
    imageId = $imageId
    imageDisplayName = $imageDisplayName
    imageType = "gallery"
    enableSingleSignOn = $ssoEnabled
    domainJoinConfigurations = $domainJoinConfigurations
    windowsSettings = @{
        language = $selectedLanguageCode
    }
    cloudPcNamingTemplate = $deviceNameTemplate
}

# Add Autopatch and microsoftManagedDesktop if enabled
if ($autopatchGroupId) {
    $params.autopatch = @{
        autopatchGroupId = $autopatchGroupId
    }
    $params.microsoftManagedDesktop = @{
        managedType = "starterManaged"
        profile = $null
    }
}
When the code is executed, we can query its contents by running $params in PowerShell.

Finally, we create the provisioning policy. The following steps are performed:
- The line $provisioningPolicy = New-MgBetaDeviceManagementVirtualEndpointProvisioningPolicy -BodyParameter $params creates a new provisioning policy using parameters stored in
$params. We then check to see if the policy was created and return this on screen. - If the provisioning type is Dedicated (e.g., for Enterprise Cloud PCs), the script prepares to assign the policy to the specific group stored in the variable $groupId.
- The policy is assigned to the group using the Set-MgBetaDeviceManagementVirtualEndpointProvisioningPolicy command. A success message confirms the assignment.
- If the provisioning type is not Dedicated (e.g., for Shared Frontline Cloud PCs), the script also assigns the policy but includes additional parameters. The assignment includes both the $groupId and the service plan ID, $servicePlanId, to allocate resources accordingly.
# Create the provisioning policy
$provisioningPolicy = New-MgBetaDeviceManagementVirtualEndpointProvisioningPolicy -BodyParameter $params

# Check if the provisioning policy was created successfully
if ($provisioningPolicy.Id) {
    Write-Host "Provisioning Policy '$policyName' created successfully with ID: $($provisioningPolicy.Id)" -ForegroundColor Green

    # Now assign the provisioning policy to the selected group if Enterprise is chosen
    if ($provisioningType -eq "dedicated") {
        $assignmentParams = @{
            assignments = @(
                @{
                    target = @{
                        groupId = $groupId
                    }
                }
            )
        }

        # Assign the policy to the group
        Set-MgBetaDeviceManagementVirtualEndpointProvisioningPolicy -CloudPcProvisioningPolicyId $provisioningPolicy.Id -BodyParameter $assignmentParams

        Write-Host "Provisioning Policy '$policyName' assigned to group '$groupName'." -ForegroundColor Green
    } else {
    #    Write-Host "Frontline policy created. No group assignment is created at present." -ForegroundColor Green
        $assignmentParams = @{
            assignments = @(
                @{
                    target = @{
                        groupId = $groupId
                        servicePlanId = $servicePlanId
				        # allotmentLicensesCount =
                    }
                }
            )
        }

    # Assign the policy to the group
    Set-MgBetaDeviceManagementVirtualEndpointProvisioningPolicy -CloudPcProvisioningPolicyId $provisioningPolicy.Id -BodyParameter $assignmentParams

    Write-Host "Provisioning Policy '$policyName' assigned to group '$groupName'." -ForegroundColor Green
    }
} else {
    Write-Host "Failed to create the provisioning policy." -ForegroundColor Red
}
Below is an example of a Frontline provisioning policy being created.

We will see the provisioning policy reflected in the Intune console with the Name, Image and License type that we specified when running through the script.

If we click into the policy, we can confirm it matches the choices we made.
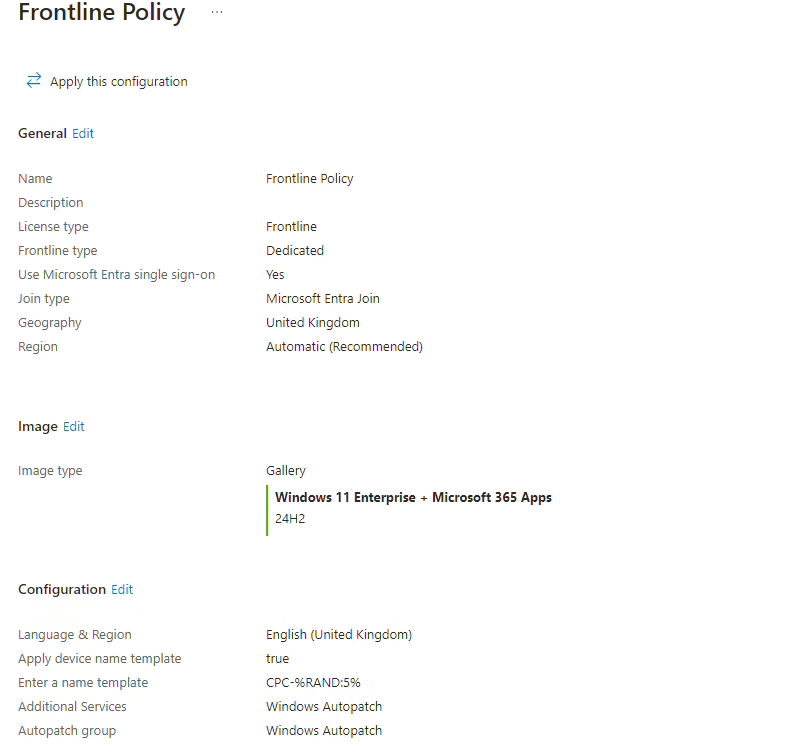
and that the assignment is correct, with the relevant service plan specified.

Finally, the Cloud PCs will be provision for the users we added to our targeted group. In our screenshot, the Cloud PCs were in a Pending state whilst they waited for other Cloud PCs to deprovision for those users.

Final Note
As we all know, Intune and Windows 365 are constantly changing with new and deprecated features. Since we completed the coding for this blog post, Microsoft has added Frontline Shared devices in preview. The code does not support this Cloud PC type as yet, but we will endeavour to update our code to support it in the near future. Watch this space!


2 comments