I’ve recently been implementing SCCM in numerous XenDesktop environments. These have all been MCS (Master Creation Services) deployments running under XenDesktop 5.6. SCCM 2012 handles it very well and I thought I’d share some of my experiences and setup for anyone jumping into this as a first-timer.
Allow the Master Image workstation to have the SCCM client installed
Under a VDI solution only the master VM image needs to have the SCCM client installed. When the master image is created with MCS install the SCCM agent on that master VM. VDI’s that are created from the master image will generate their own machine ID’s that will persist with the device.This means that the devices will appear in the console alongside the physical devices, one record per device.
Run AD Users and Computers. Create an account that will be used to push install the SCCM client to the master image. In this instance an account called SCCMLocalAdmin has been created. Set the password to never expire.

Add the account to the local administrator group on the master image machine.
Set the account as the Client Push Account
In the Administration workspace; click Site Configuration>Sites. Right click the site in the main body pane and choose Client Installation Settings>Client Push Installation. Click the Accounts tab and then the yellow star burst icon and choose New Account.
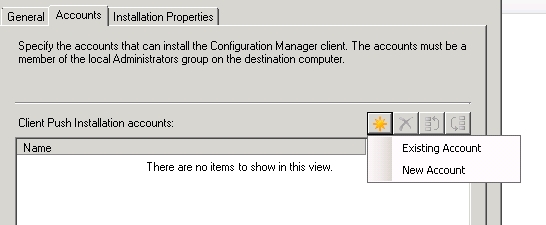
Add in the username/password for the SCCMLocalAdmin account. Click Ok twice.
Install the SCCM Client
With the above criteria in place SCCM 2012 will install the SCCM Client onto the VDI master VM. Ensure that the following are allowed through the Windows Firewall if using the Push install method.
- WMI
- File and Print Sharing
Once install completes you will need to make the following changes to the master image prior to snapshot.
- Stop the SMS Host Service – to do this run the command net stop ccmexec as an administrator
- Delete the SMSCFG.ini file from the Windows folder – to do this run the command del %WINDIR%\smscfg.ini
- Delete the SMS certificates – to do this run the following line in PowerShell – Remove-Item -Path HKLM:\Software\Microsoft\SystemCertificates\SMS\Certificates\* -Force or from DOS using powershell -command “Remove-Item -Path HKLM:\Software\Microsoft\SystemCertificates\SMS\Certificates\* -Force”
- Remove the Inventory Action ID 1 in WMI – to do this run the command
wmic /namespace:\\root\ccm\invagt path inventoryActionStatus where InventoryActionID="{00000000-0000-0000-0000-000000000001}" DELETE /NOINTERACTIVE
Do not follow the advice from the Citrix Team Blog which is to install the client and forget about it. This approach will generate bad mifs in your environment. See my post on the subject here.
Defining the SCCM Client Settings within a VDI environment
Since the master image is the reference point for all your updates you only want to update that master image during any patching exercises. If you applied any updates to the cloned desktops these would be lost on a log off and therefore generate unnecessary network traffic and disk activity when downloaded and installed again. SCCM 2012 provides a way to disable the update deployment. According to The Citrix Blog
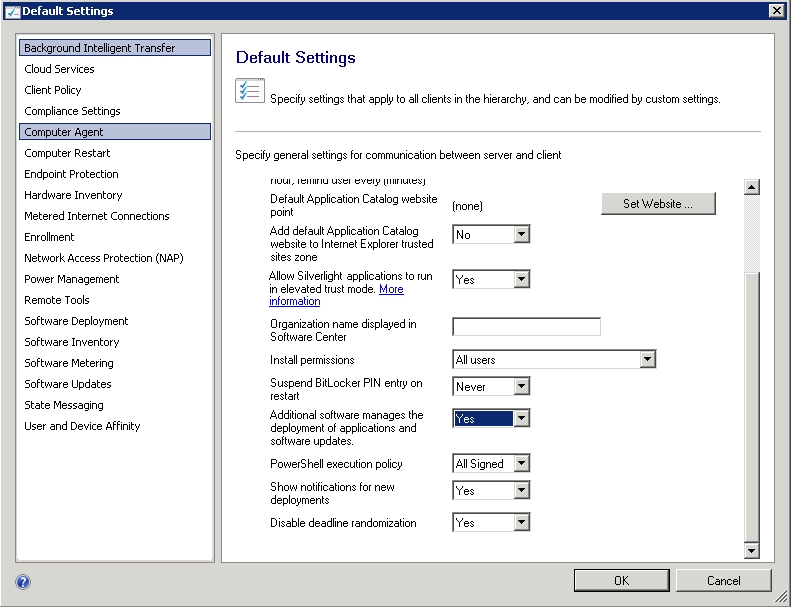
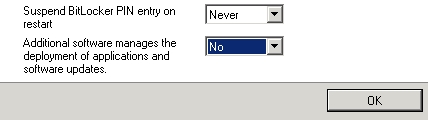
‘To address this, Configuration Manager 2012 provides a simple mechanism to disable the update deployment. In the Configuration Manager console you can define a custom client setting for the Computer Agent. Within that there is an option called ‘Agent extensions manage the deployment of applications and software updates.’ – pre SP1 and ‘Additional software manages the deployment of applications and software updates’ – post SP1 Setting that to Yes instructs the SCCM agent to do all of its normal information discovery operations but not attempt to download/apply any software updates. Once you have defined this policy you can apply it to any collections of virtual desktops which are built on shared images. Your master VMs can be in different collections which don’t have this policy applied so that they will continue to download and apply updates.’
I would advise against applying this to your clients. The main reason being that if you are using application deployment such as App-V your packages will fail to deploy if you enable this in your client settings (note MSI deployment still works). Hmm not good!
Also if you decide to deploy updates that are targeted to the cloned devices, and not the master, they will still download – but not install – to the device.
Just take care when targeting the deployment of updates!
If you decide to go ahead, enable this client setting as below. Target the client policy at the cloned VDI’s only (details on how to create your collection later).
Click Computer Agent and change the value for ‘Additional software manages the deployment of applications and software updates’ to Yes. Click Ok.
Create a Master Image collection
Create a collection for the master image. This can assist with targeting software update deployments Add in the device using either a direct or query rule. I tend to add in direct for this single device collection.
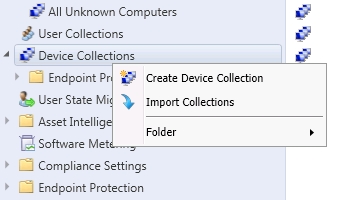
To create a direct rule collection that will contain only the master image VM, go to the Assets and Compliance workspace, right click the Device Collection node and choose Create Device Collection.
Add a Name for the collection and click the Browse button to choose a Limiting Collection. Choose All Systems as the limiting collection. Click Next.
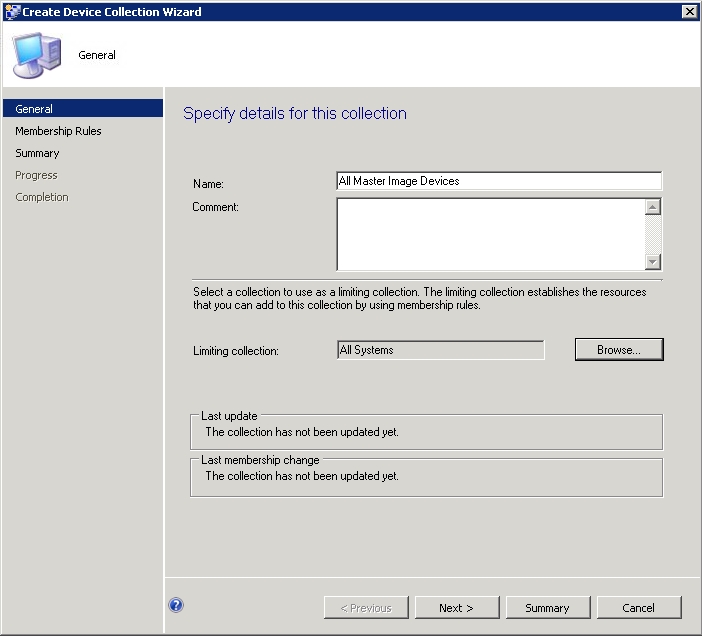
Click Add Rule>Direct Rule. Add in the master image VM. Click through to the end of the wizard.
Refresh the Device Collections and the Member Count will increment by the number of workstations added.

If you have set the client previously at the Default Client Policy level then be sure to set the master image to use SCCM to handle updates with a separate policy. Again, my advice, don’t use the Citrix recommended method.
Configuring Software Updates
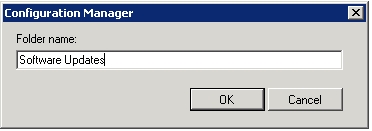
In the Assets and Compliance workspace right click Device Collections and choose Folder>Create Folder. Name it ‘Software Updates’.
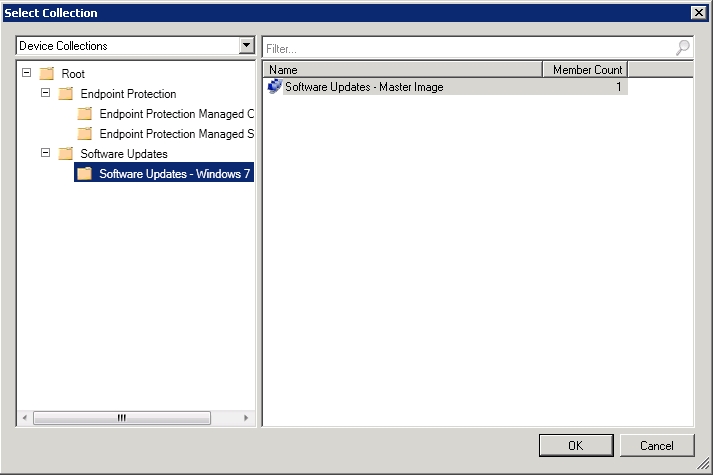
Create a sub folder called Software Updates – Windows 7. Right click the Software Updates – Windows folder and create a Device Collection.
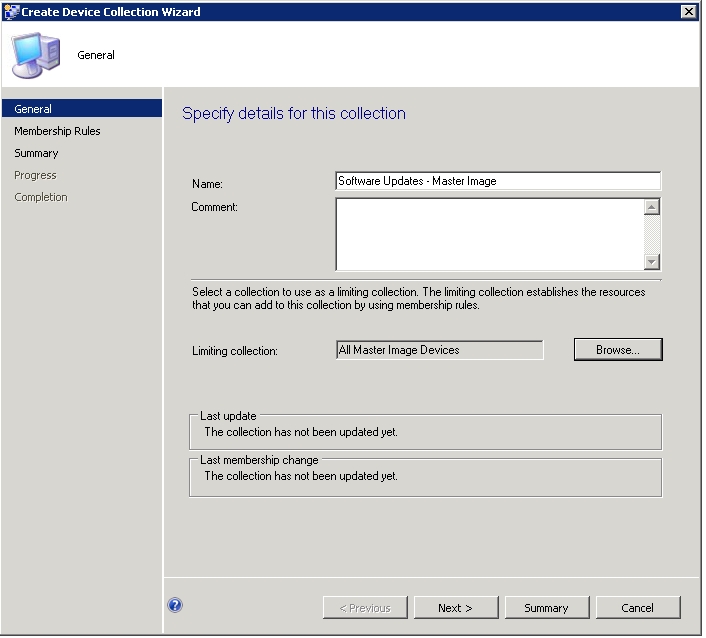
Enter a name for the Collection. In this instance the software updates will be targeted at the master image VM only, I name this collection ‘Software Updates – Master Image’. Click Browse and use the All Master Image Devices collection created earlier.
Add in the master image VM by either a direct or query rule and click through to the end of the wizard.
When creating my ADR for updates I ensure that the collection that is targeted for deploy is the ‘Software Updates – Master Image’ collection.

When I schedule the ADR to run I then ensure that the master image is powered on and available. Once updates are deployed to the master image I can then snapshot the master VM and update the Citrix catalogs with the changes.
What about SCEP?
SCEP has to be handled in a slightly different way when it comes to definition updates and policies, compared to Software Updates. The principles are the same, the SCEP install needs to reside on the master image only and not be deployed to the cloned VM’s. I’ll cover SCEP in the future post.
Targeting the Virtual Devices
I mentioned earlier that I’d cover how to create a collection of VDI based devices and it’s a fairly simple procedure to get the information required to create the collection into SCCM.
The following new machine attributes will be available to you via the combination of SCCM 2012 and XenDesktop 5.6.
CCM_DesktopMachine (Generic SCCM virtual desktop attributes; value below apply for XenDesktop environments)
- Host Identifier – Name of the XenDesktop broker site hosting the desktop
- Is Assigned to User – True if desktop has been assigned to a user
- Is Machine Changes Persisted – False if desktop provisioned from a shared image (i.e. with PVS or MCS) – eg.0
- Is Virtual – True if desktop is a VM
- Partner – Citrix
Citrix_VirtualDesktopInfo (Citrix-specific attributes)
- Broker Site Name – Name of the XenDesktop broker site hosting the desktop
- Desktop Catalog Name – Name of the machine catalog within the site
- Desktop Group Name – Name of the desktop group within the site
- Is Assigned – True if desktop has been assigned to a user
- Is Virtual Machine – True if desktop is a VM
- OS Changes Persist – False if desktop provisioned from a shared image (i.e. with PVS or MCS)
- Persistent Data Location – Location where machine ID information is stored (see below)
- Personal vDisk Drive Letter – Drive letter for the Personal vDisk that is attached to the VM (if any)
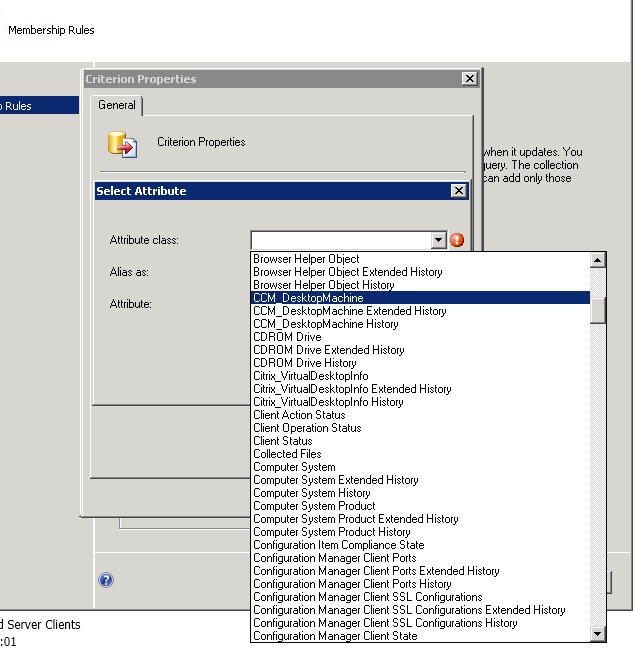
To add the classes so they can be queried, go to the Administration workspace; click Client Settings. Right click the Default Client Settings and choose Properties.
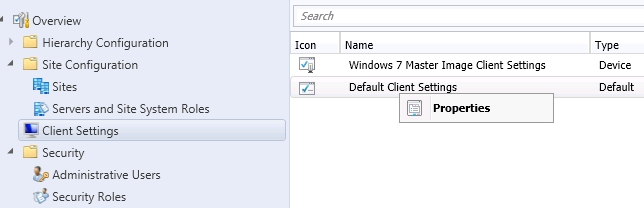
Choose Hardware Inventory and click Set Classes.

Click the Add button and then click Connect.
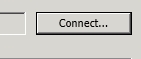
Enter the computer name of a XenDesktop device that has the SCCM client installed – such as the master VM.
Enter root\ccmvdi as the WMI namespace and click Connect.
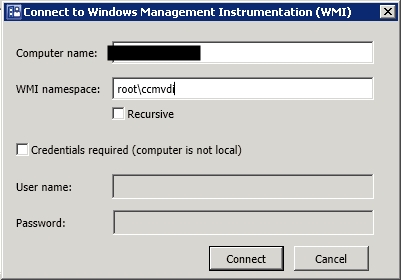
Select CCM_DesktopMachine. Click Ok.
Click Add and Connect again. Enter root\citrix\desktopinformation in the WMI namespace. Click Connect.
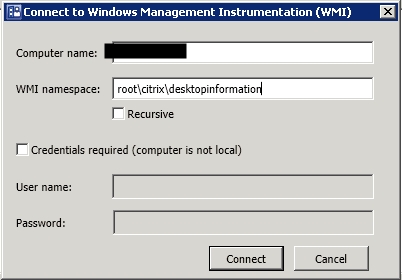
Select the Citrix_VirtualDesktopInfo class and click Ok.
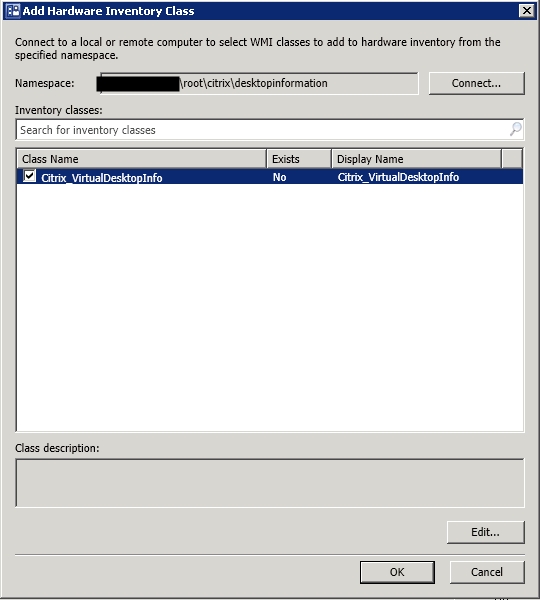
Click Ok again and the classes will be collected by the hardware inventory.

Once the policy has applied to the client the next run of the Hardware Inventory retrieval will add the details of the classes into the Hardware details of the machine.
To check the classes are in the Hardware Inventory find the device in the SCCM Console in Assets and Compliance>Devices. Right click the device and select Start>Resource Explorer.
Look for the classes in Resource Explorer.

This means that a query based collection can be created using the classes within the query. e,g ‘Is Virtual = 1 and Is Machine Changes Persisted = 0’ if a cloned VDI.
As mentioned earlier look out for the future post on SCEP intregration with SCCM 2012/XenDesktop 5.6.
I hope this post helps get you started on VDI management with SCCM. I’m interested if you have further thoughts/feedback in this area.

Reblogged this on ParrisFamily.Com and commented:
Good to know!
Hi,
thanks a lot for this comment. What about the future post regarding SCEP you mentioned? Is it on the way?
Best regards
Sam
Not had chance yet Sam. It’s on the to-do list.
Cheers
Paul
well we had this available in 2007 with custom noidmif file we deployed together with sccm client on the master image. problem was that it took a long time till these clones appeared in the collection. Basically it took time that is defined as HW inventory cycle.
Hello,
Looking forward to your post on SCEP recommendations in a VDI environment! Do you know when you will be blogging on that topic?
Thank you,
Stephen
Stephen i never got round to that post unfortunately and i doubt that i will revisit it. Apologies Paul
Have you ever had issues with XenDesktops not all showing up in SCCM? For example, we have this setup on a few master images, and the the Xens (which have PvDs attached) seem to work correctly, but only a handful of the Xens actually show up as having the client in the console.
Have you provisioned the SCCM client correctly?
Yes. After the client is installed and it has updated policies (SCEP, etc.), I’ve followed everything you list under ‘Install the SCCM Client’. Before the Citrix admin runs inventory on the image, I double check the service to be sure its still stopped.
That’s interesting. I’ve not seen this before. Is your system discovery configured OK?
As far as I know (specific AD OUs, delta and scheduled discovery, only discover in x time, etc.). The computer resources were previously in SCCM from the system discovery. I deleted them, but only the few came back and the rest have since been rediscovered from the system discovery, (but still list as having no client). I have tried leaving them in SCCM to see if they will update the resource. I have also tried deleting all of them except the base, and finally deleting all including to base to see what is returned, but they all seem to have the same result.
Jason – what’s the status of the clients on the devices? i.e. do they look healthy (all the tabs). Check the smscfg.ini file on each effected device, are they unqiue. It would be great to see the log files of one of the devices that isn’t working.
The client health for those that show up look good. Activity is current, last update time on antimalware policies, fairly recent client check evaluations, etc. As far as the smscfg, everything is unique with the exception of the machine SID. I tried deleting a machine resource that listing has not having a client, and then running a machine policy update. It did not show up or come back in to SCCM (I’ll probably see it back from the system discovery).
I’ll have to dig through the logs and see if anything stands out.
Paul,
Thank you this article. Our team is currently switching our AV over to SCEP. We use Citrix XenDesktop with MCS to provision our images. Our images are setup to discard on reboot. I was wondering if you could tell me about how you update your definitions for Endpoint. See that Citrix XenDesktop optimizations have us disable Windows Auto-Update, do you use the UNC path update these definitions?
Hi Timothy, if you are disabling Windows Updates in the master image then you won’t be able to leverage updating the definitions IIRC.
Hi ,
i have one question .
Do we need to install Citrix Connector in the SCCM server ?
No you don’t
Hello,
I came around your Blog post, because we experience issues with SCCM client and our MCS provisioned Server 2016.
We already used the mentioned commands to remove smscfg.ini, certs and wmi object on our 2008R2 farm with success.
Now on Server 2016 this doesn’t work properly.
around 50% of the Servers are creating a cert wiht the same Thumbprint and with name of the Master VM.
I’ve already uninstalled the SCCM client and deleted the all remains from the system and deployed this naked image.
But as far, as SCCM pushes the client to the Server2016 VDAs 50% are generating the cert and SCCM GUID which should be that from the Master.
Any ideas?
Eddy,
Are these persistent VDI devices?
No. All non-persistant.
What I’ve also found is, that the SMBIOS UUID changes on affected machines. As far as I know the SMS GUID should change, if the SMBIOS UUID was changed.
TBH Eddy, I can’t see the point of managing non-persistent VDI’s via SCCM. There’s no real value add.
If your question is, why we want to use SCCM at non-persistant VDAs?
We use it to have SCEP (Win Defender) Policies also on our VDAs. Nevertheless we also use it for updating the master image.
OK. Sure. I can’t really answer your initial question. I’ve not seen this behaviour and I don’t have access to anything that would allow me to replicate. So sorry I can’t help in this instance.