
This blog is a series of guides which aim to run through the Conditional Access (CA) templates which Microsoft has published under the title Conditional Access templates (Preview). The templates get you up and running with CA but what is the impact of turning on the policies on devices, how can you adjust the templates to work in your environment and what does the end user experience look like on the endpoint?
The series is co-written by Paul Winstanley, a six times Enterprise Mobility MVP based in the UK and Mike Marable, an active member of the MEM community, based in the US.
Conditional Access Overview
Conditional Access rules are a type of if-then statement. If a user wishes to access something then they must complete an action to be able to access. Conditional Access rules get enforced once first-factor authentication has been completed.
Conditional Access use signals to make a decision and then enforce the decision to allow or deny access as per this diagram from the Microsoft documentation.

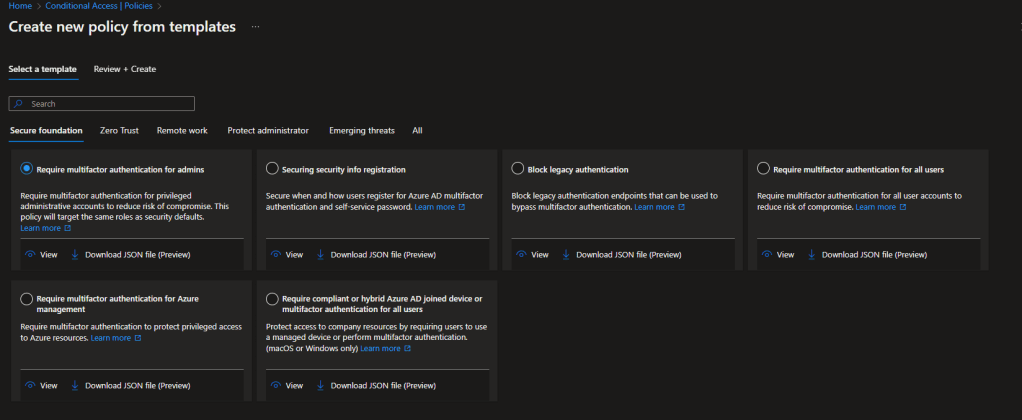
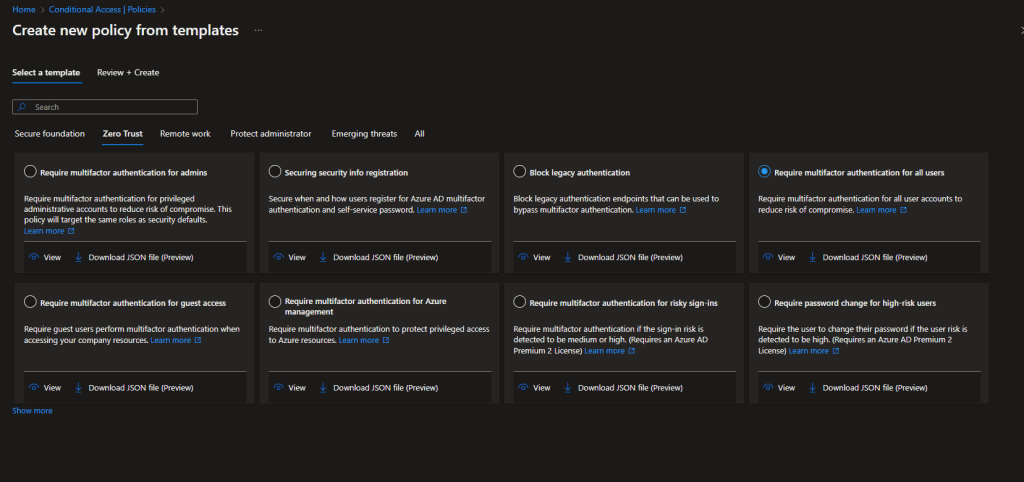
Microsoft introduced the Conditional Access templates at the end of 2021 as convenient method to deploy policies. These 16 templates cover five different deployment scenarios:
- Secure foundation
- Zero trust
- Remote work
- Protect administrators
- Emerging Threats
This series will cover the 16 templates in detail.
- Part 1 – Block access for unknown or unsupported device platform
- Part 2 – Require multifactor authentication for all users
- Part 3 – Require multifactor authentication for admins
- Part 4 – Require multifactor authentication for guests
- Part 5 – Require multifactor authentication for Azure Management
- Part 6 – Require Password Change for High Risk Users
- Part 7 – Require multifactor authentication for risky sign-ins
- Part 8 – Use application enforced restrictions for unmanaged devices
- Part 9 – Require approved client apps and app protection
- Part 10 – Require multifactor authentication for Microsoft admin portals (Preview)
Multifactor Authentication
Pre-Requisites
Note the following pre-requisites to be able to tap into Multifactor Authentication (MFA).
- Azure Premium P1 licences
- Management of the policies via an administrator with either Global Administrator, Conditional Access or Security Administrator rights. Some MFA settings can also be managed by the Authentication Policy Administrator.
Overview
Azure AD Multifactor Authentication works by requiring two or more of the following authentication methods.
- Something which you know – typically a password
- Something which you have – such as a trusted authentication device, for example a mobile phone or a hardware key.
- Something you are – these are biometrics e.g. fingerprint or facial scan.
There are specific verification methods available to you within Azure and when users authenticate with an application or a service will be presented with a multifactor form of authentication which must be fulfilled to be able to access.
The registration of these forms of verification can be managed by the end user via the https://myprofile.microsoft.com portal.
The methods available to the end user are:
- Microsoft Authenticator app
- Windows Hello for Business
- FIDO2 security key
- OATH hardware token (preview)
- OATH software token
- SMS
- Voice call
There are various settings, in Azure AD, which can determine the frequency of users re-authentication. The authentication could be first factor, e.g. password, FIDO, or it could be multifactor.
The Azure AD default for user sign-in frequency is a rolling window of 90 days. Repeatedly asking users for credentials can have a negative impact of a user supplying credentials unintentionally to a malicious credential prompt. Try to avoid MFA fatigue at all costs.
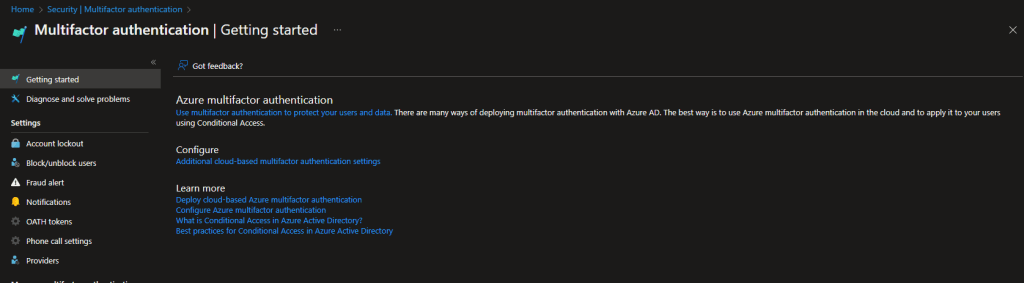
The default setting for user sign-in frequency is located in the MFA settings in Azure AD. Note though that this is a legacy portal. It isn’t part of the regular Azure AD portal.
Navigate to Azure Active Directory\Security\Multifactor Authentication. Click the link Additional cloud-based multifactor authentication settings.
In the section remember multi-factor authentication on trusted device you will see the 90 days figure for the Number of days users can trust devices for. This default option can be adjusted accordingly. Enabling the checkbox Allow users to remember multi-factor authentication on devices they trust allows the user to disable prompts for approval for that time period on the device they are using.
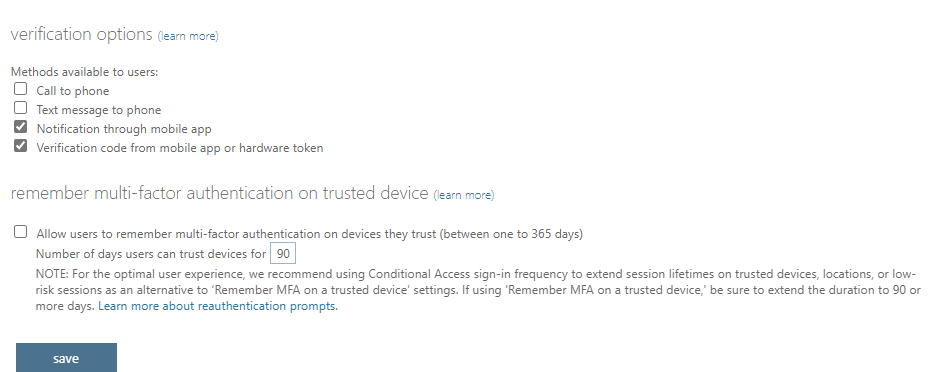
When authenticating, users will be able to suppress the approval for the 90 day period.

Number Matching
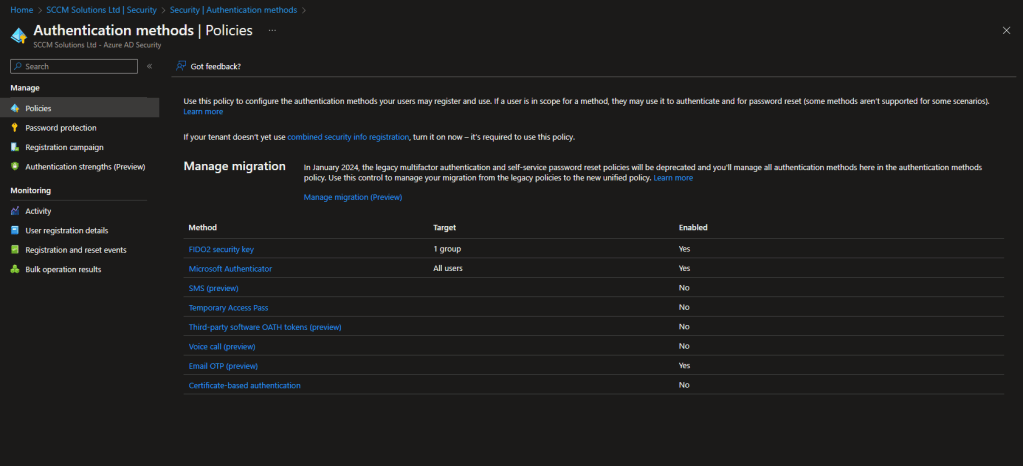
To assist with stopping users blindly accepting MFA prompts, Microsoft is making number matching mandatory for all tenants from the end of February, 2023. You can enable this method in advance by going into the Azure AD portal and clicking Azure Active Directory\Security\Authentication methods\Microsoft Authenticator.
Number matching is available for the following scenarios:
- Multifactor authentication
- Self-service password reset
- Combined SSPR and MFA registration during Authenticator app set up
- AD FS adapter
- NPS extension
If you have not enabled the Authenticator app as an authentication method, click the Enable button under Enable and Target and set the targeted users in the Include section.
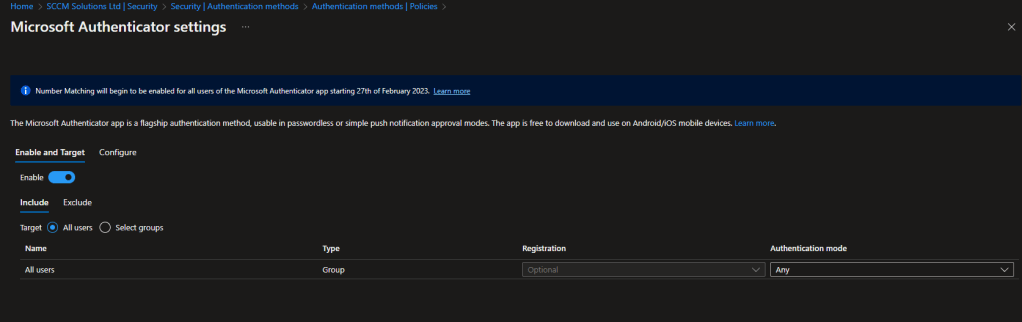
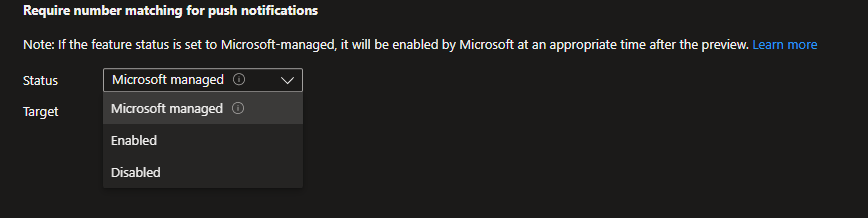
In the Require number matching for push notifications section, the Status drop down contains the following choices:
- Microsoft managed
- Enabled
- Disabled
Note the Status of Microsoft managed. This option is a convenient way for a business to trust Microsoft to enable or disable a feature by default.
When setting this to Enabled, Save the change.
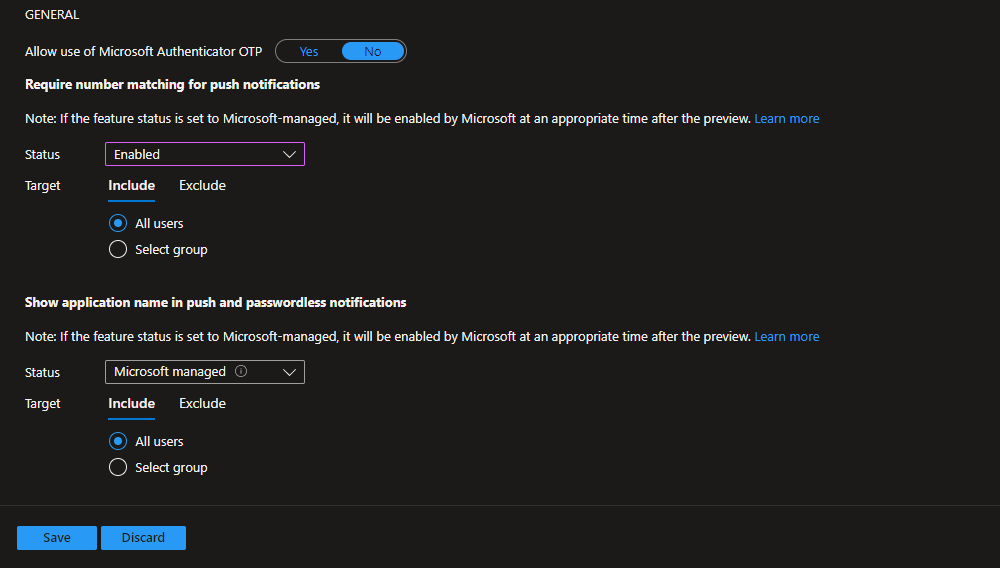
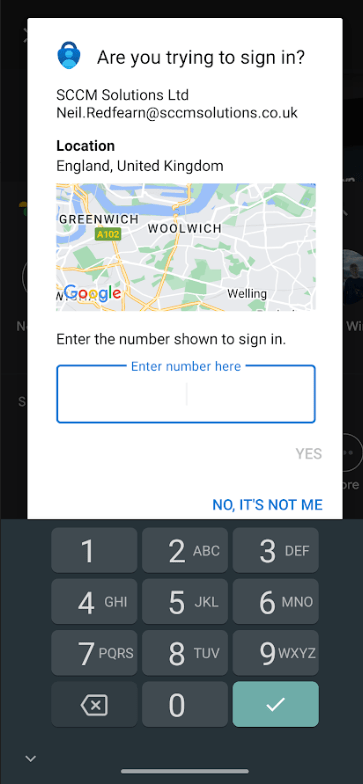
On the Authenticator app, users will be challenged to enter the digits displayed on the MFA prompt.


It is also worth enabling the policy Show geographic location in push notifications.
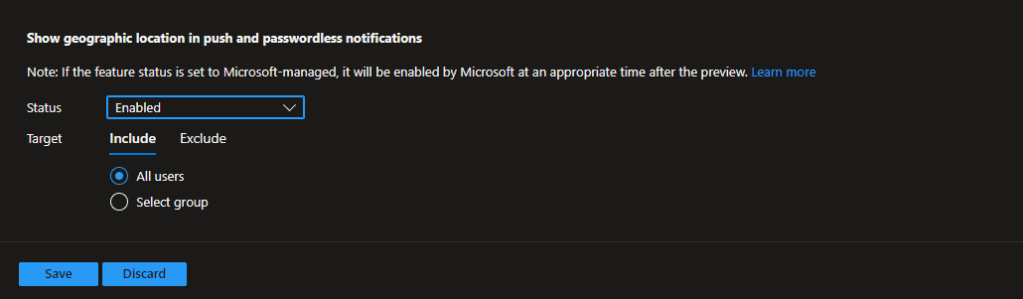
On the Authenticator app, the user will be shown an area on a map based on the IP address where the sign-in originated from. This visual allows the user to understand if the sign-in came from them.
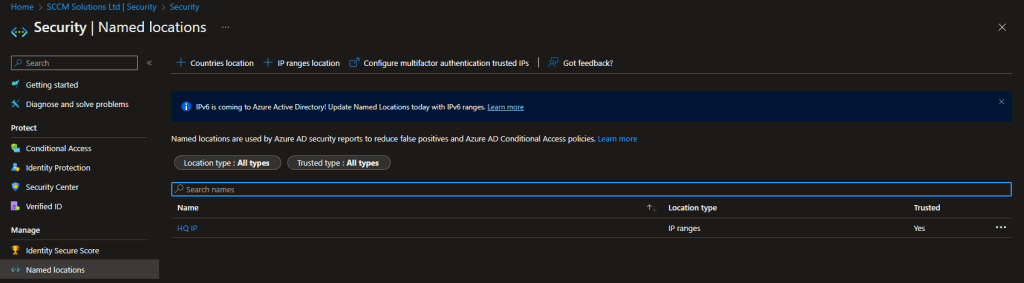
Named Locations
Named locations, in Azure AD, can be set to define a companies head office location, VPN networks or ranges you wish to block. The location is determined by the public IP address. You can then exclude these address from MFA prompts, if you so desire.
Note that you can add trusted ips to the older MFA portal.
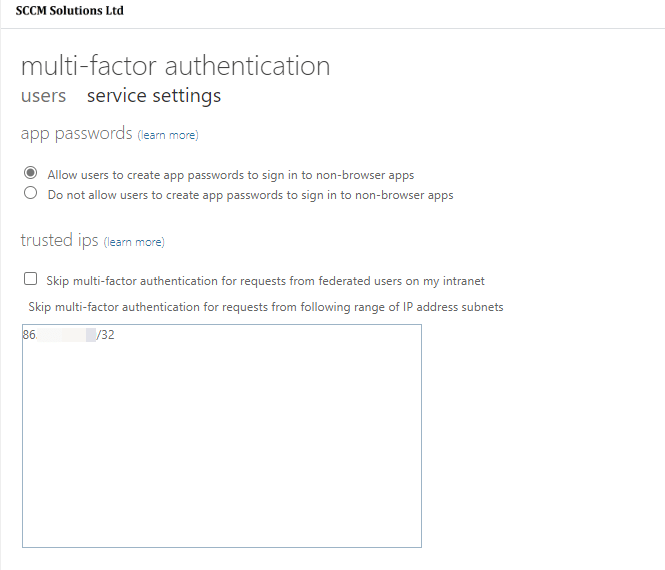
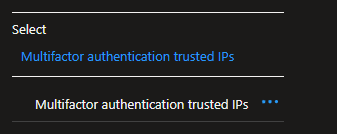
These will appear as Multifactor authentication trusted IPs when you use them in your Conditional Access rule.
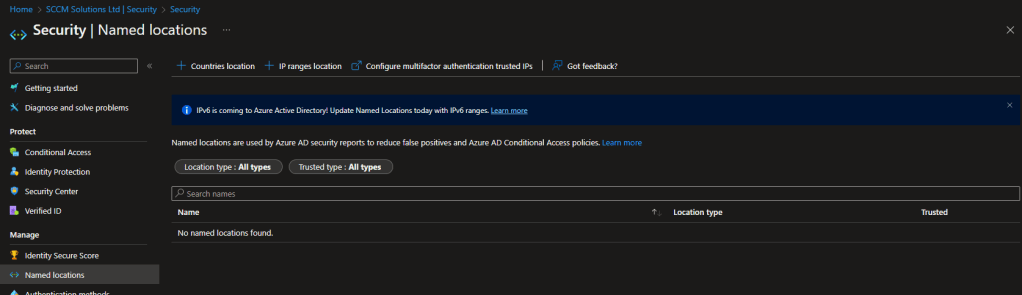
Ideally, you want to set these Named Locations in the Azure AD portal location Azure Active Directory\Security\Conditional Access\Named locations.
Clicking Configure multifactor authentication trusted IPs will send you to the older portal above, therefore click IP Ranges location.
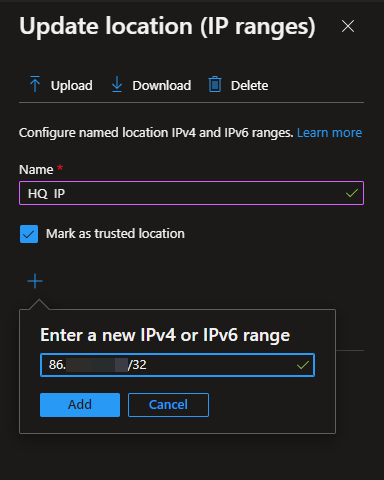
Enter a Name for the location. You can optionally Mark as a trusted location, which is worth enabling if you want to add trusted locations in your CA rule. Finally enter the IPv4 or IPv6 range of the network and click Add. Click Create.
MFA Onboarding
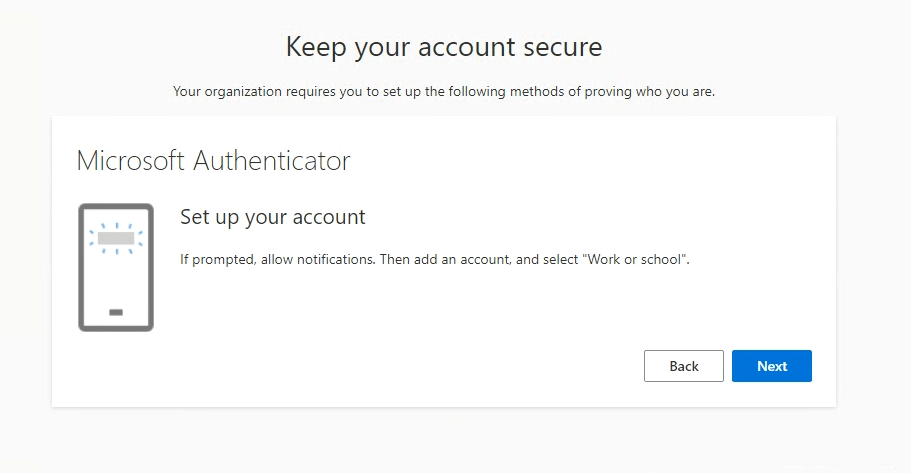
When MFA is enabled for a user and they are targeted for a require MFA rule in Conditional Access, they will need to onboard the first time they authenticate. The process is as follows, if you have the Authenticator app as an MFA method.
Note that they will be asked to onboard, even if the MFA rule has a Named Location exclusion and they are authenticating from a location in that Named Location’s range.
When signing in, you will be prompted that there is More information required. Click Next.

You’ll be prompted to get the Microsoft Authenticator app on your mobile device. When you have done so click Next.

Click Next.
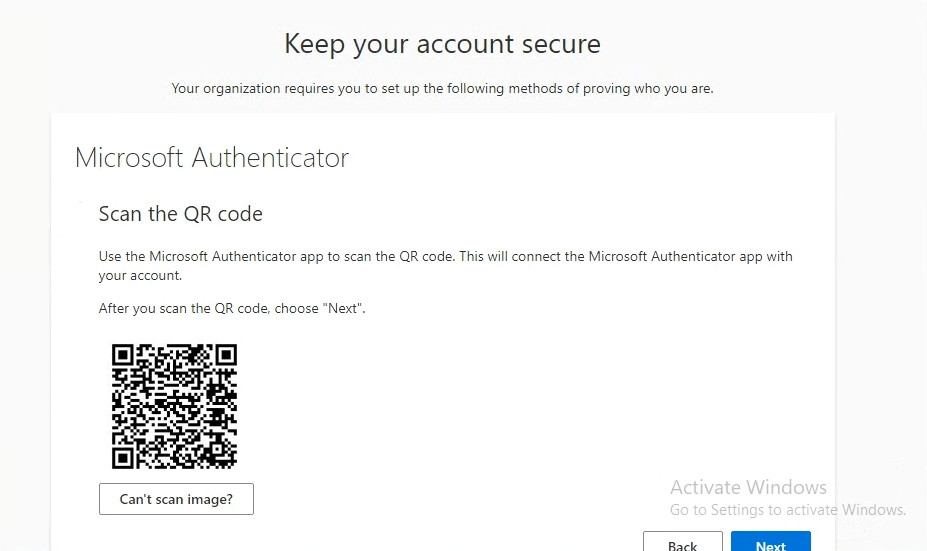
In the Authenticator app on your device, click the + icon and then add a Work or school account, then Scan a QR code.
Scan the code presented on the screen and this will add an account in to the authenticator app. Click Next.
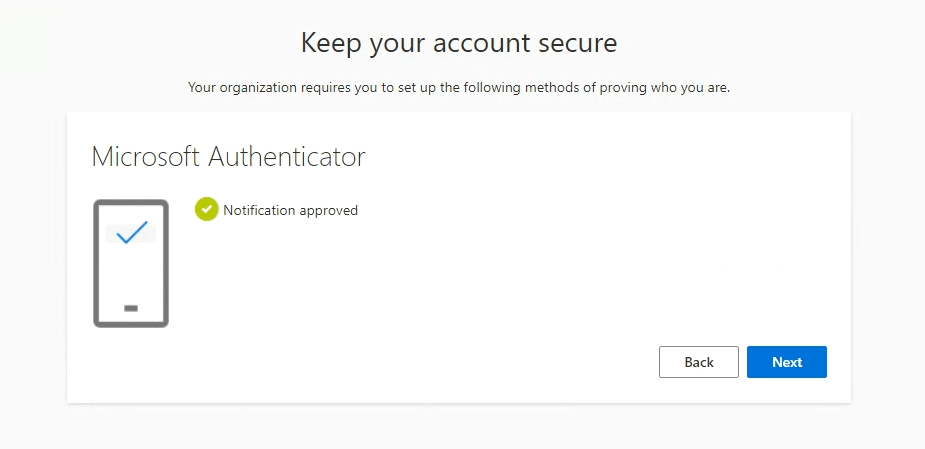
You will be prompted to test the notification works in the app and that the set up is configured correctly.

When you have successfully approved the notification, you will be able to click Next.
Click Done to complete.
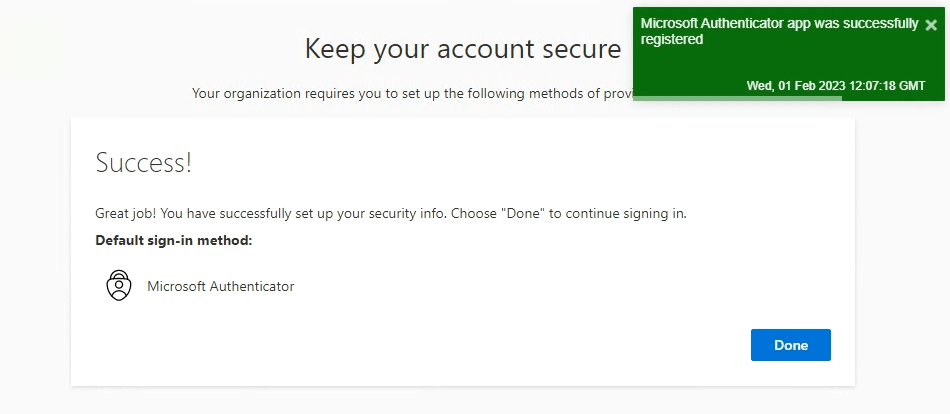
In the Microsoft My Sign-Ins portal, you will see the sign-in method listed in the Security info section.

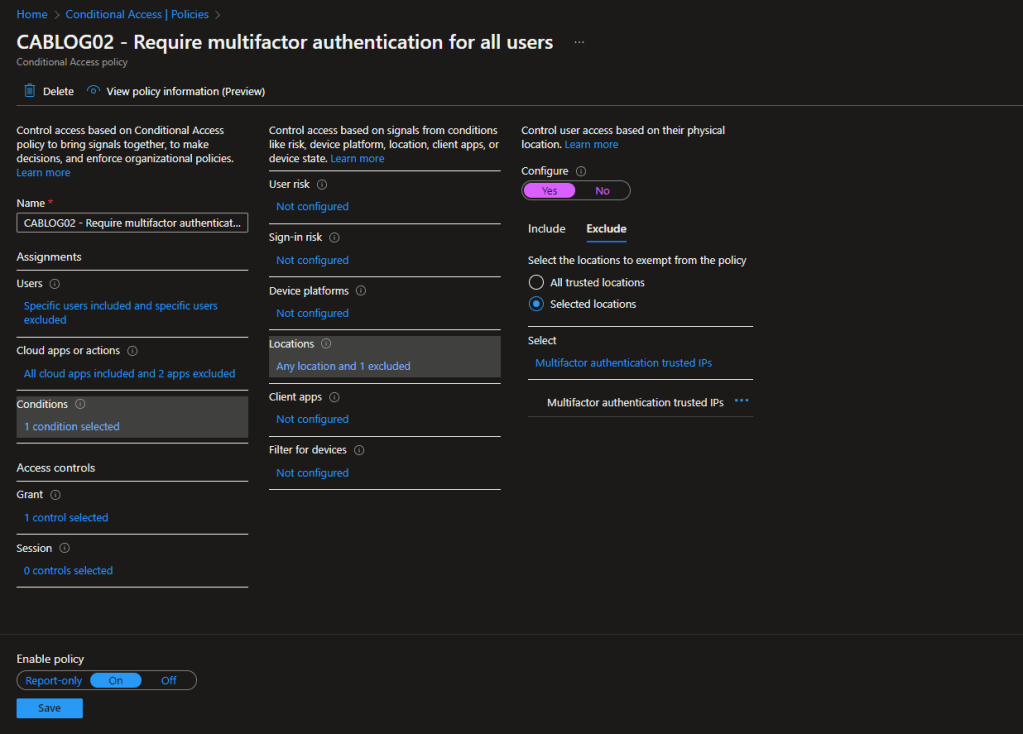
Require multifactor authentication for all users
This Conditional Access policy requires multifactor authentication to be satisfied when users access Cloud Apps, use User Actions or Authentication context.
It is created in the Azure Portal under the Conditional Access\Policies blade, or in the Microsoft Endpoint Manager console under Devices\Conditional Access.
Click the New policy from template (preview) link.

The policy is available in the Secure Foundation, Zero trust and Remote work scenarios, or you can click All to display all the templates.

You can click the View option to view the default settings for the policy.
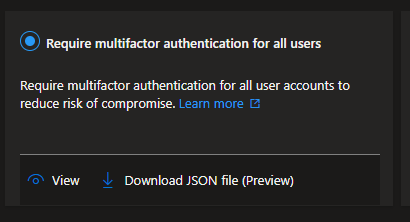
These are the settings for the Require multifactor authentication for all users template.
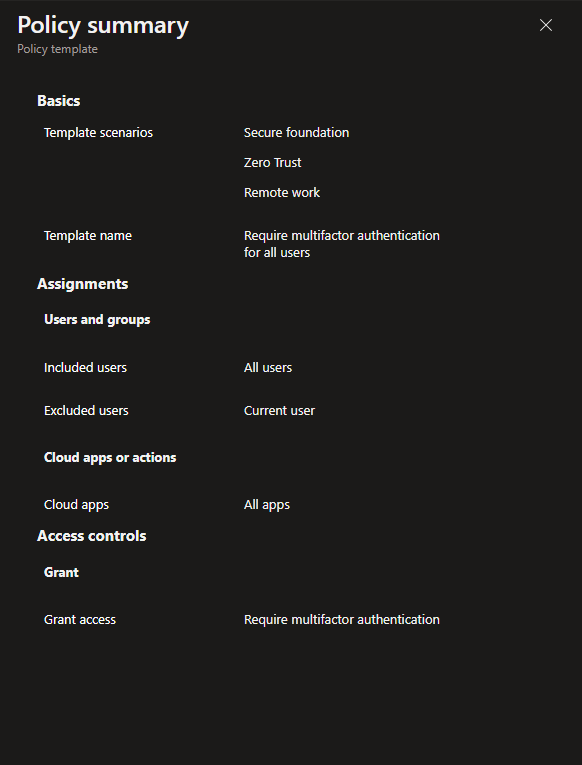
To break down the policy:
| Users: | All Users are Included – The current user creating the policy will be excluded |
| Apps: | All Cloud Apps are included |
| Access Control: | Grant access – Require multifactor authentication |
When the policy is created it is set as Report-Only. This is good practice, as the impact of enabling the policy can be assessed before doing so.
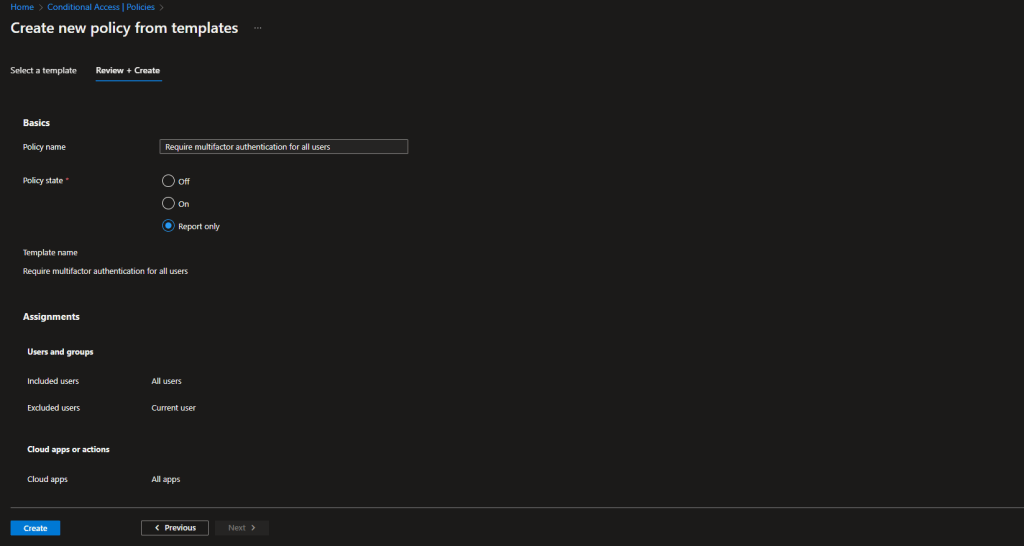
For our testing, we have created a group called CA Test User Group and added our test users to it. In the policy, under Users, we have chosen Select users and groups and picked the group to filter for. The user creating the policy via the template is excluded by default, but it is recommended to ensure you have a break glass account which can be used to access should the rule cause problems.

In the Access controls\Grant section of the rule, you can see that Require multifactor authentication is selected as the control.

When you are ready to move from the Report-Only mode, switch the toggle to On.
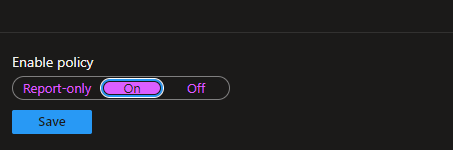
The state of the policy will be reflected in the console.
Companies which use Subscription Activation to enable users to ‘step-up’ from one version of Windows to another, may want to exclude the Universal Store Service APIs and Web Application from their all users all cloud apps MFA policy. This is another MS recommendation.

For our testing, we also excluded our Named Location from the MFA rule. You can exclude either All trusted locations, or click Selected locations and choose specific ones.

Impact of enabling the policy
The following tests were undertaken on each device platform, the end result expected would be that we were prompted for MFA unless we were in a named location on any OS. Allow users to remember multi-factor authentication on devices they trust was not enabled in the tenant and number matching had not been turned on at this point, therefore the standard MFA prompt was expected. We tested the policy by authenticating into office.com.
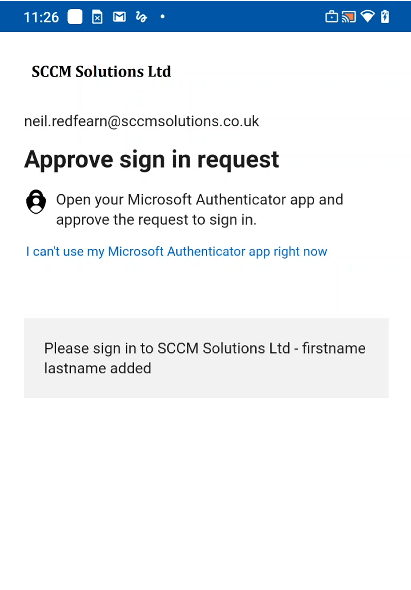
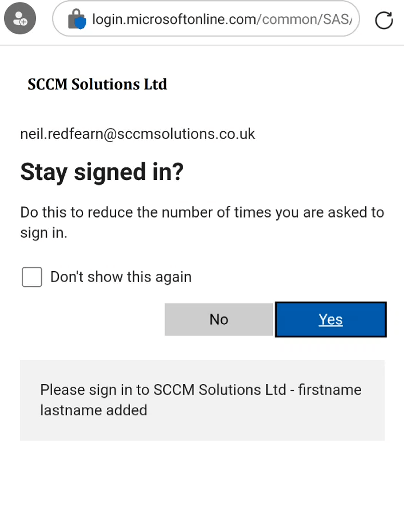
Windows
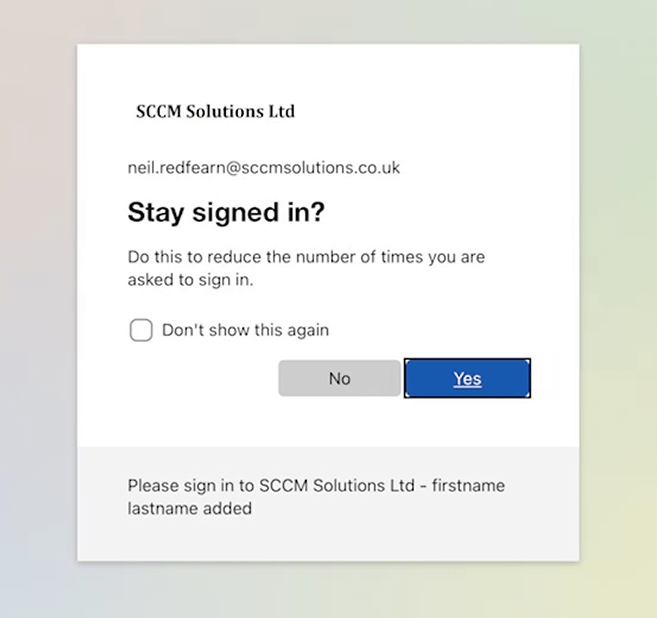
On a Windows device, the user was prompted with Approve sign in request.
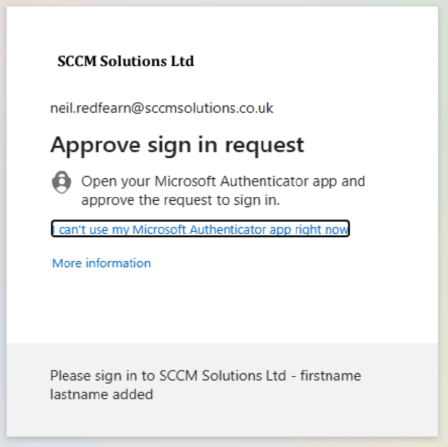
Once approved, they were asked if they wanted to Stay signed in?

macOS
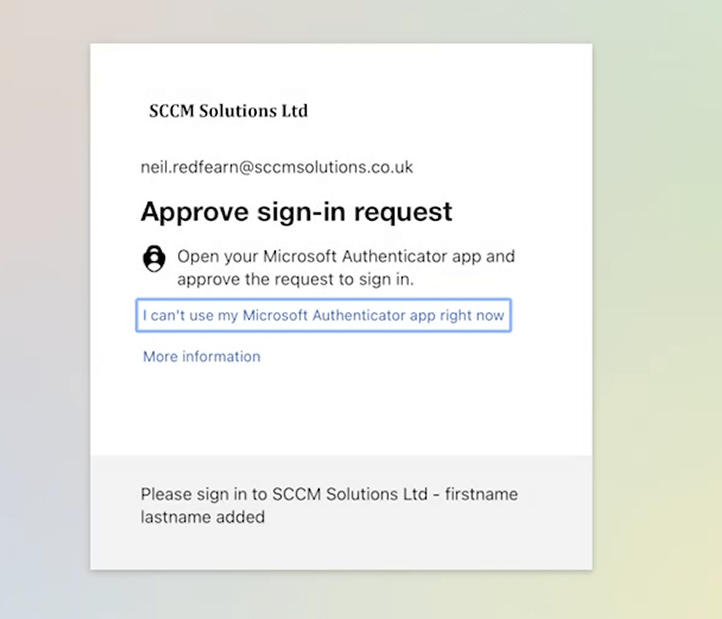
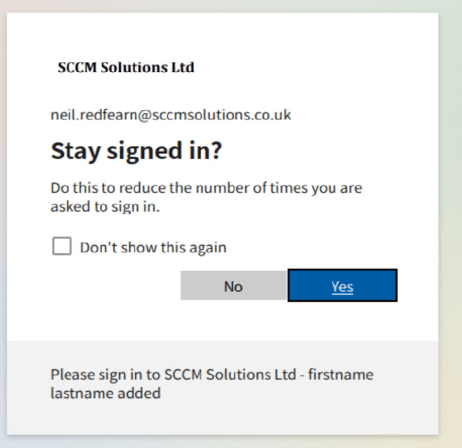
On a macOS device, the user was prompted with Approve sign in request.
The user was not prompted to stay signed in.
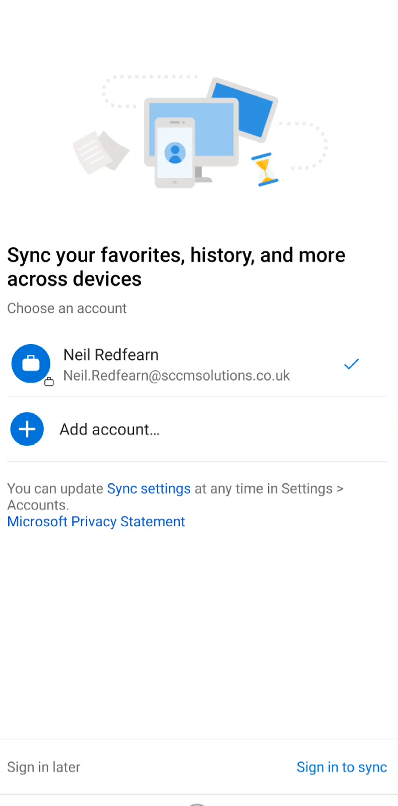
Android
On an Android device using the Edge browser, the user was prompted to Sign in to Microsoft Edge with a work or school account? We selected No thanks.
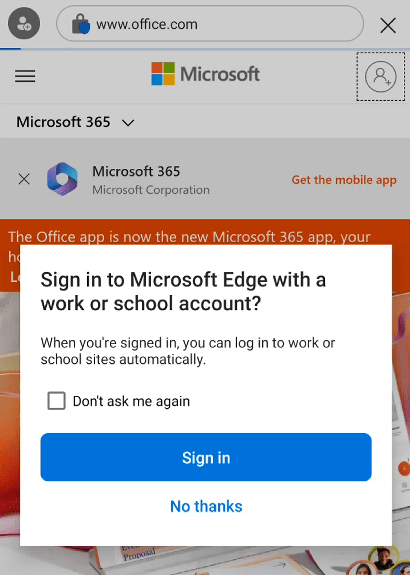
After entering the user name and password, the user was prompted with Approve sign in request.
Once approved, they were asked if they wanted to Stay signed in?
If the user clicked the Sign in option.
they entered a username and clicked Sign in to sync.
The user was then prompted for a password and asked to MFA but not requested to stay signed in. When opening office.com, they were automatically authenticated to the portal after clicking the Sign in button on the web page.
iOS
On an iOS device using the Edge browser, the user was prompted to Sign in to Microsoft Edge with a work or school account? We selected No thanks. The user was prompted multiple times to sign in on the iOS device unless we selected Don’t ask me again.

After entering the user name and password, the user was prompted with Approve sign in request.
Once approved, they were asked if they wanted to Stay signed in?
If the user clicked the Sign in option.
they were prompted to add an account.
The user was then prompted for a password and asked to MFA but not requested to stay signed in. When opening office.com, they were automatically authenticated to the portal after clicking the Sign in button on the web page.
Linux
On a Linux device, the user was prompted with Approve sign in request.

Once approved, they were asked if they wanted to Stay signed in?
Checking the Sign-in Logs
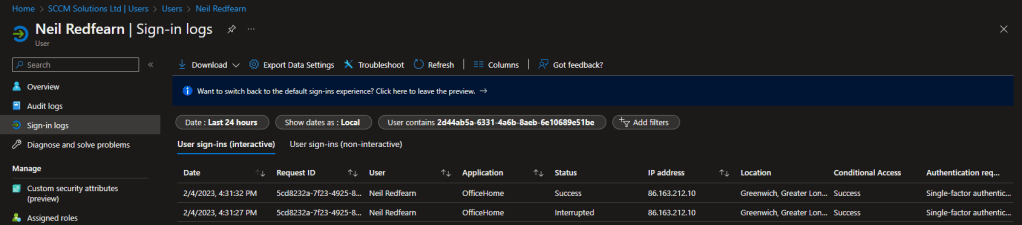
When it comes to investigating Conditional Access policies, we refer to the Sign-in logs in Azure Active Directory. You can check the sign-ins against an individual user by going into the the Azure Active Directory blade and selecting Users. Search for the user and select, then click the Sign-in logs menu entry.
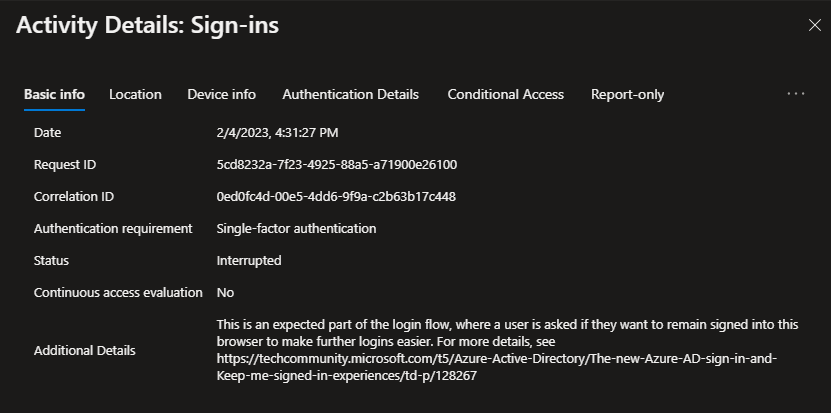
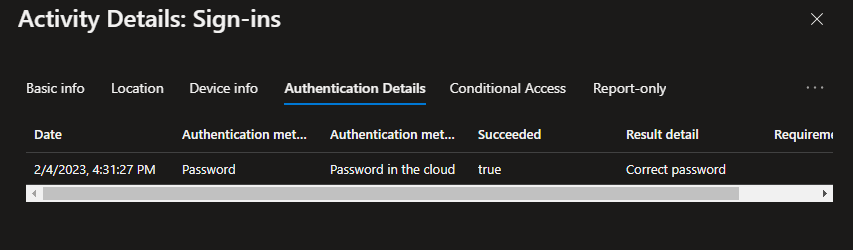
For the multifactor authentication sign ins, our user Neil gets in interruption in the sign in flow. Note the Status is listed as Interrupted. The additional details list the interruption as:
‘This is an expected part of the login flow, where a user is asked if they want to remain signed into this browser to make further logins easier’
The Authentication requirement is listed as Multifactor authentication.
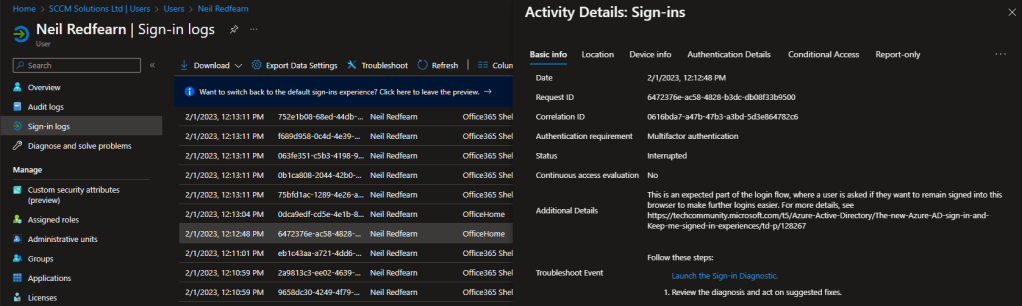
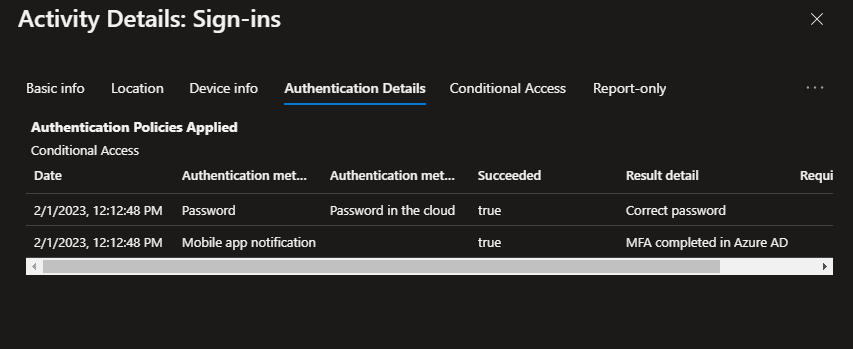
In the Authentication Details tab we can see that multiple methods of authentication have taken place, the Authentication Methods column shows Password and Mobile app notification and that the Result detail was Correct password and MFA completed in Azure AD.
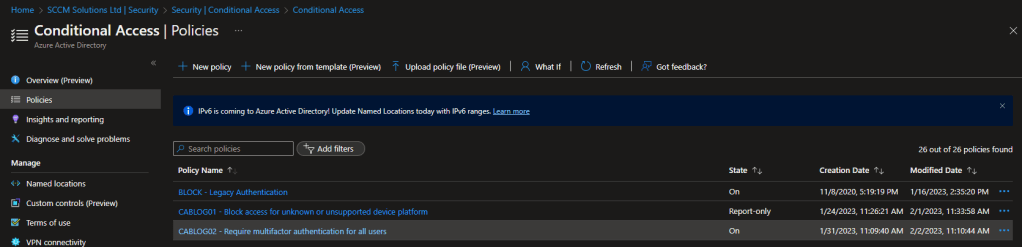
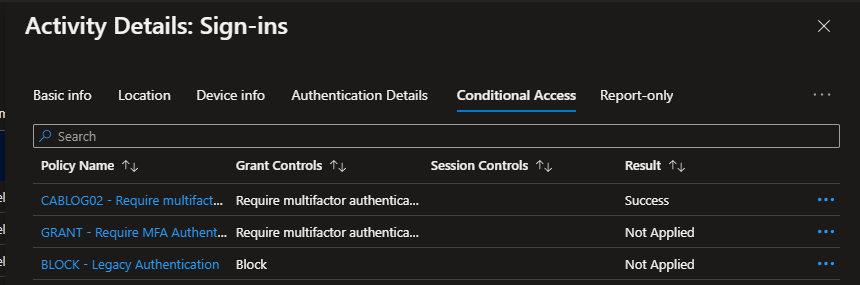
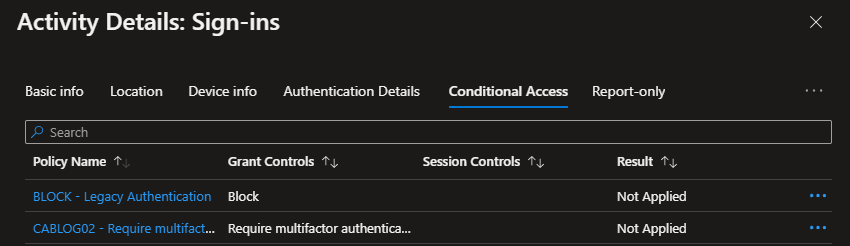
The Conditional Access tab shows that the rule CABLOG02 – Require multifactor authentication for all users has been applied with Success.
With the Named Location being excluded from the CA policy, we expect different events in the Sign-in logs.
We once again see the Interrupted Status for the sign-in.
This time, however, the Authentication requirement is Single-factor authentication.
We can see our Trusted named location listed in the Location tab.

and that only a Password was required in the Authentication Details.
Since the sign in location was excluded from the require MFA rule, the user is exempt from the rule and therefore it reports as Not Applied. Check the Result column for confirmation of that when drilling into the sign-in event.
Further reading
Take a look at the following Microsoft documentation if you want to read some more on Multifactor Authentication.
- How it works: Azure AD Multi-Factor Authentication – https://learn.microsoft.com/en-us/azure/active-directory/authentication/concept-mfa-howitworks
- Protecting authentication methods in Azure Active Directory – https://learn.microsoft.com/en-us/azure/active-directory/authentication/concept-authentication-default-enablement
- Optimize reauthentication prompts and understand session lifetime for Azure AD Multi-Factor Authentication – https://learn.microsoft.com/en-us/azure/active-directory/authentication/concepts-azure-multi-factor-authentication-prompts-session-lifetime
- How to use number matching in multifactor authentication (MFA) notifications – Authentication methods policy – https://learn.microsoft.com/en-us/azure/active-directory/authentication/how-to-mfa-number-match
- Using the location condition in a Conditional Access policy – https://learn.microsoft.com/en-us/azure/active-directory/conditional-access/location-condition
Look out for the next part of the blog.

I was trying to follow this step-by-step. At this point in your document, you instruct that we should click the ‘Configure Azure multifactor authentication’ link. However, this is in the ‘Learn more’ section and is a document link. I think you intended to instruct the reader to click the ‘Additional cloud-based multifactor authentication settings’, correct?
That’s correct Mike. I need to update this. Thanks for spotting. Cheers Paul
Forgot to include the link to the spot in your document:
https://sccmentor.com/2023/02/05/just-dropped-in-to-see-what-condition-my-conditional-access-rule-was-in-part-2-require-multifactor-authentication-for-all-users/#respond:~:text=Click%20the%20link%20Configure%20Azure%20multifactor%20authentication.